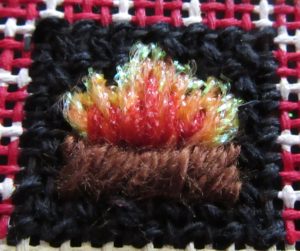
Stitching a log and fire whether a campfire, fire under a witch’s cauldron. or a fire in a fireplace can be problematical. How do you make the fire look real? How do you make a log look round?
Today we’ll look at ways to easily stitch these items using this small Beyond Basketweave canvas from Painted Pony.
Fireplace Back
Look at your fireplace, even if it has electric or gas logs, the back is always black brick. This is traditional. It may originally come about because the soot blackened the bricks that were there. As time went on I’m sure it was because the soot would not show on the black and because the contrast made the fire look brighter. Today I’m sure it’s just what we expect to see.
Lightly stitching this area in T Stitch, below, using a matte thick black thread is perfect. This is enough stitching to make the black look solid, but not so much to make it compete with the other elements.

Your thread should be slightly thicker than normal and should be no shinier than cotton floss. This can be stitched before or after the fire.
Fire
I’ve rarely seen a fire in needlepoint that looks real, our stitches and threads just are not up to that. However you can get a good-looking fire by stitching it in stages, with each round of stitching slightly shorter than the previous round.
This works because flames are not a uniform color. In fact, the different colors indicate different temperatures of the flame. For these kinds of fires, three colors arw used: yellow, orange, and red. One color will be used in each pass.
All the stitches are Gobelin Stitches in various lengths. They will all start at the bottom of the fire, nearest the logs and will end in different places.Several stitches will share the same beginning hole, but each will end in a different place.
Begin by making the yellow stitches. These will cover the entire fire and are made using a very sparkly yellow Fyre Werks (FT84). This thread is used here because it is less translucent and more sparkly than Water n’Ice which is used in the other passes. These characteristics create a realistic start for the fire.
The next two passes are stitched with Water n’Ice. First orange (WT4), then red (WT5). These passes are shorter than the previous pass and cover less of the fire.
If you want to add some sparks to your fire (this fire is too small for that), you will want to use a gold metallic ribbon. Make a waste knot away from the fire and plunge your needle into the canvas near the base of the fire using slightly loose tension. Secure the thread to the back of the canvas. Cut the stitch on the front of the canvas slightly shorter than you want the sparks to be and remove the knot. Tease the braided strands of the ribbon apart.
Cut the thread on the back and repeat for other areas of sparks.
Logs
Creating a nicely rounded log is easier than you might think. It uses a simple form of Stumpwork, padding to create a rounded shape.
In padding layers of thread are built up using rounded threads. The top layer is then stitched over this and the needlepoint is dimensional almost like magic.
For padding to work the padding stitches must do two things:
- Each layer must be one thread bigger all around than the layer below.
- Each layer’s stitches must be perpendicular to the layer below.
Here I used brown pearl cotton for the padding. The first layer of padding went over one thread and was horizontal, similar to the picture below.

The second layer went from left to right, one thread in from the ends of the log, and was horizontal, below.

Over this I stitched the log in a fluffy unidentified brown thread from my stash. Normally you would use a stranded thread here and make the stitches vertical. If you do this you may need to add more strands to your thread.
When I tried this with a single-strand thread I had poor coverage. By changing to a diagonal stitch I avoided this problem. It still works because there is a change in direction between the laters.
About Janet M Perry
Janet Perry is the Internet's leading authority on needlepoint. She designs, teaches and writes, getting raves from her fans for her innovative techniques, extensive knowledge and generous teaching style. A leading writer of stitch guides, she blogs here and lives on an island in the northeast corner of the SF Bay with her family

Leave a Reply