Last week I got questions from a reader about the right way to approach stitching a canvas when the colors are scattered. She’s concerned about two circumstances:
- when there are several colors in one line
- when there are individual stitches of one color scattered around
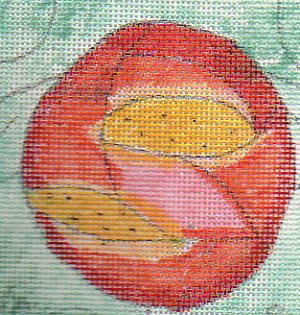
You can see both of these in the unstitched canvas pictured above.
First let’s cover some general rules. Then we’ll talk about what to do in these specific circumstances.
General Rules
When you are stitching, you will get the best results by stitching from light threads to dark. This keeps the threads looking cleaner because strands from dark threads won’t pollute the lighter threads. It also creates two layers of stitching, the front and back of the stitches, between the front of the piece and any thread going between stitched areas. These are called traveling threads.
If a thread needs to travel more than 1/2″, end it and start it in the new area.
If the thread needs to travel over open, i.e. unstitched, canvas, pull the traveling thread through the backs of already completed stitches.
If there will be lots of open canvas, before you begin to stitch, baste a sheer fabric in a color to match the canvas to the back of the canvas. It’s a judge’s trick I learned to avoid having traveling threads show.
Rules for Scattered Stitches
The biggest problem here is that you are constantly having the thread travel from one stitch to another. The big concern is that these threads will show. They will not show if there are stitched areas between the isolated stitches. If the color is dark stitch in the order you normally would from light to dark. If the color is light, stitch most of the intervening colors first.
To make the isolated stitches easier to find, mark their location with blunt counting pins. You could even use short head pins from the beading store for this.
You will want to minimize the thread on the back even if it won’t show. Do this by planning out the path you will stitch. Look for stitches that are 1/2″ or less apart from each other. Stitch these as a group. End your thread then go to another group where the stitches are less than 1/2″ apart. Continue in this way, stitching each group until all the isolated stitches are complete.
If your color has both groups and isolated stitches, stitch all the groups where the would go in the light-to-dark sequence then stitch the isolated stitches.
Rules for Multiple Colors in one Line
If you are stitching row by row and find multiple colors in a row, most of the time you will park the needle away from the line you are stitching, and unpark it to use the next time the color comes up. By doing this, the traveling thread will be behind the intervening stitches and will not show.
Do this all the time, except:
- If the thread is near the end. Then just end the thread.
- If the next area is more than 1/2″ away. Then end the thread and begin with a new thread later.
The next Mindy stitch guide will appear April 18. Watch for an announcement tomorrow.

About Janet M Perry
Janet Perry is the Internet's leading authority on needlepoint. She designs, teaches and writes, getting raves from her fans for her innovative techniques, extensive knowledge and generous teaching style. A leading writer of stitch guides, she blogs here and lives on an island in the northeast corner of the SF Bay with her family
Thanks so much for responding to my question. I think I am good to go now! I really appreciate your help.
All the best!