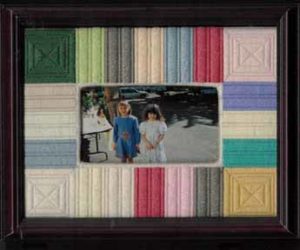
This charming needlepoint mat for a photo is a perfect project when you have lots of colors of a single thread in your stash. The original was stitched in shades of Silk & Ivory, but other silks or silk/wool blends that are fluffy will work beautifully. It’s designed so that the outside dimension will fit in a standard frame, so it’s an easy project to finish yourself.
The design was inspired by a picture in a magazine I saw of a frame made out of bits of old painted lumber. The colors were faded, like these milky pastels. But where the paint was flaking we are getting texture from the stitches.
Materials
- 18 mesh interlock white needlepoint canvas 13 x 15 (mono also works)
- stretcher bars
- extra fine pen for marking canvas
- Silk & Ivory silk/wool blend, 1 skein each in at least 7 of the colors listed below:
white (02),turquoise (22), sawdust (87), honeydew (49), sand (07), taffy (33), raspberry (07), rhubarb (37), blue chip (17),teal (20), tangerine (47), lemon ice (06), taupe (08), blue yonder (106), cameo (79), butter rum(39), slate blue (35) hyacinth (66), saffron (121), evergreen (09), eucalyptus (38), cucumber (99), pail grey (113), saffron (121), and others
Note on thread colors:
The wooden frame I have adapted has many colors of faded soft paint. The list of colors includes many of the colors in the line which fit this color scheme. Choose at least seven of the colors for your frame. Make sure at least two are white and natural along with at least one other “near white.” The more colors you have, the fewer times they will repeat. Do not pick all pastel colors, you will lose definition, make sure some of the colors you pick are medium values. All pastels will look too washed out.
Stitching
Mark a 3″ x 5″ rectangle in the center of the canvas with your pencil. Lightly mark the center of each side. The center should be a hole (not a thread)
Mount your canvas onto stretcher bars.

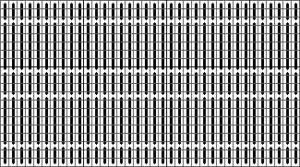
Begin stitching the sides of the frame by centering a stripe on the bottom. Using the chart for the side (pictured above), make the center stripe. The center narrow part of the stitch should be over the center hole you marked. Now make two more stripes next to it, working towards a corner. Next make the other two stripes, finishing this side.
Next make the stripes going up each of the short sides. These stripes and the outer stripes of the bottom should share a hole at the corner. Then stitch the stripes across the top.
Each stripe should be a different color on each side. At least one stripe should be white, natural or near white on each side.

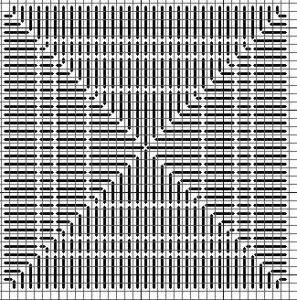
With the sides completed, stitch the corner rectangles. Each corner should be a different color, with at least one corner being one of the darker colors. The corner blocks should fit into the corners exactly, but if they don’t adjust at the center, not in the borders. The chart for the corners is above.
Since pictures are just slightly smaller than their stated size, you will finish by making a straight Gobelin border over 3 threads ending just inside the marked smaller rectangle. Use white for this border.
Stretch your needlepoint before finishing.
Finishing
If mono canvas was used, run a line of fray stopper or white glue about 1/4” around the outside of the needlepoint and inside the area for the photo. In the inner area, run it to the corners of the stitching.
Fray stoppers can cause some dyes to run, so don’t let it touch the needlepoint. This step is not needed for Interlock canvas because the weave of Interlock keeps it from unraveling.
Set aside to let dry.
Get your frame and remove the back, glass and any inside stuff. Cut the foam core to fit snugly inside the frame This will keep the needlepoint in place when the frame is finished.
Cut the outside of the matboard to be just smaller (1/8”) than the needlepoint. This allows space for the needlepoint to turn under.
The tricky part is cutting out the inside of the mat. Draw diagonal lines from one corner to the other on the back of the matboard. Where they intersect is the center of the mat. Your needlepoint is going to frame a 3”x5” picture, so the space will need to be a bit smaller than 3”x5”. Measure the inside space of the needlepoint and subtract 1/8”. Now divide by 2. This shows how far to go out from the center for each side. Mark those points and use a T-square and a pencil to make these lines. When all four sides are marked, there will be a rectngle marked on the back of the matboard. Use a hobby knife to cut out the rectangle.
Cut out the finished and stretched needlepoint, both inside and out. Across the outside corners, cut off the corners at a diagonal. Inside cut a line going from the corners of the square up to (but not into) the corner of the stitching. This will help the needlepoint lay flat.
Place the cut mat onto the back of the needlepoint and put the whole thing on a piece of wax paper. Make sure the hole in the matboard is over the hole in the canvas and the board is centered on the canvas.
Using a plastic knife, spread Turbo Tacky Glue (available from Amazon) onto one edge of the back of the matboard. Pull the needlepoint edge evenly to the back (it will be unstitched canvas) and hold it down until it sticks (just a couple of minutes usually). Repeat with the opposite side.
Use the same method to do the other two sides. Let the glued matboard sit for a few minutes until the glue has started to set. There will be bits of canvas sticking up at the corners. These will be cut off once the glue has set overnight.
Glue the inside edges in a similar way, although you can probably glue and hold two adjacent sides at the same time.
Once all is glued and the glue has taken hold, leave the covered mat to sit overnight (about 10-12 hours).
Cut off the corners which stick out on the back of the picture.
Get your photo and center it inside the mat opening. Use acid-free masking tape to secure it the back of the matboard. Now put this whole thing on top of the foamcore. Remove the masking tape carefully, without moving the picture and mark the outside of the picture on the foamcore. Remove the picture.
If you want make the picture permanent, put archival quality (acid-free) glue stick on the back of the picture and put it onto the marked space on the foam core. Press down to make sure it sticks.
Put the mat into the picture frame and center it in the frame. Now put the foamcore with the picture into the frame — it should fit very snugly.
To make the back look very neat, use a piece of decorative scrapbook paper cut just smaller than the outside dimension of the frame back. Use a glue stick, glue or framer’s tape to put this onto the back.
Voila! Add a picture hanger to the back and the frame is finished.
About Janet M Perry
Janet Perry is the Internet's leading authority on needlepoint. She designs, teaches and writes, getting raves from her fans for her innovative techniques, extensive knowledge and generous teaching style. A leading writer of stitch guides, she blogs here and lives on an island in the northeast corner of the SF Bay with her family

This is a cool project, and I’ll be saving the post to have stitches on hand.
Just an idea—this seems like an ideal project to use plastic canvas—no finishing or anything, and it makes things nice and non-saggy. I know we serious needlepointers just don’t use plastic canvas, but I saw a friend’s canvas needlepoint mat once, and it looked sloppy –too bad after all that work. I though then that plastic canvas would have been a lot easier to handle.
It would work well for plastic canvas, but because the smallest mesh for it is 14, you would need to adjust the sizes.
But you can use the same threads for 14-count plastic canvas as you use for 18-mesh needlepoint canvas.
Keep stitching,
Janet