Updated September 9, 2022.
You can start today and have a fantastic Halloween decoration done in time for trick or treaters.
We’ll go through, step by step, everything you need to make your own delightful Halloween picture.
You can make this project inexpensively by using canvas and threads from your stash. A dollar store frame finishes it up.
You’ll need:
- 4×6 dark or black frame from dollar store
- 8×6 square of 13 or 14 mesh mono needlepoint canvas
- black metallic thread (model uses Kreinik braid)
- two shades of orange thread in contrasting textures (I used Silk & Ivory and Frosty Rays from Rainbow Gallery)
- black extra fine Pigma micron
- black or gray fabric marker
- orange fabric marker
- stretcher bars to fit canvas
Begin by using the paper that comes with the frame to trace a template for the picture. Place the paper on your canvas and draw along a canvas line two threads outside the paper using the extra fine marker. Needlepoint takes up some of the canvas, so you need the extra so no canvas will show.
The next step is the fun part. Right now, the Web is full or spooky, charming, cute, and even elegant templates for carving pumpkins. A Google, Instagram, or Pinterest image search for pumpkin carving templates yields lots of designs in all kinds of styles. Another search on Jack o’Lantern face gives lots of more traditional looks.
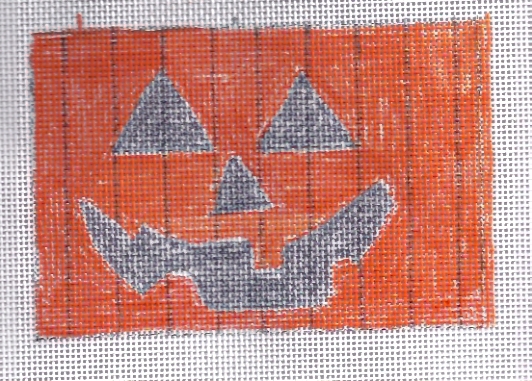
Once you have found your face, use a photocopier or image-editing software to make the design about 3″ by 5″ so it will fit nicely into your frame. Place this under your needlepoint canvas and use your black marker to trace the design. Remove the paper and color the face using the wider black or gray marker. You can see my colored canvas above.
Mark the background for stripes. Find the middle of the canvas and draw a line four threads to either side of it. Now mark every ninth thread to the sides.
Let dry overnight.
To prevent canvas show through, use the orange marker to color the canvas. Let dry overnight.
Mount the needlepoint onto stretcher bars.
Now you are ready to begin stitching. Stitch the face in Basketweave using the black thread.

Once the face (or other “carved” design is stitched, stitch the background, alternating stitches and threads. I used Bernadette, pictured above, a Diagonal Cashmere variation, and Reverse Vertical Triple Diagonal Brick (pictured below).

When it’s stitched and blocked if you didn’t use stretcher bars, trim to 4 threads beyond the stitching, Cut the corners diagonally to reduce bulk. Fold needlepoint over the cardboard that came with the frame. Fit this into the frame. If it is too bulky to close, remove the glass and close the frame.
A delightful Halloween decoration is yours!

About Janet M Perry
Janet Perry is the Internet's leading authority on needlepoint. She designs, teaches and writes, getting raves from her fans for her innovative techniques, extensive knowledge and generous teaching style. A leading writer of stitch guides, she blogs here and lives on an island in the northeast corner of the SF Bay with her family
Great post, thanks for linking up with us! I really hope you’ll participate again next month because I can’t wait to see what else you come up with