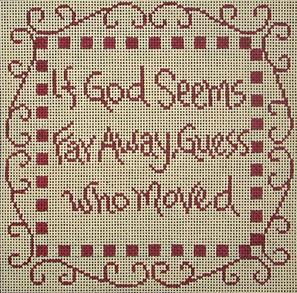
Letters can often be the focus point of a needlepoint piece, such as the Cooper Oaks piece pictured above that I’m currently stitching.
But there is a problem that occurs whenever lettering covers only one thread. You can easily get letters with gaps in them. That happens because Tent Stitches, unlike Cross Stitches, have a specific direction. When the direction of the stitch and the direction of the line match or are straight, you get solid lines, below. If the stitch and line directions are opposite, you get dotted lines, below. You can see in the diagram below how even changing to the reverse stitch direction does not completely solve this problem.

This happens whenever there are single-thread lines in Tent Stitch. Some designers try to avoid this in their designs, but with letters you can;t avoid it. One way to solve the problem is to make thicker letters, but that won’t work with every design.
What’s a stitcher to do?
There are several methods you can try:
- Use Cross Stitch. This solves the problem nicely but means you may need to switch to a thinner thread for comfortable stitching.
- Use wrapped stitches. This will give the letters a very different look than the surrounding stitching. It may also make the lines thinner or thicker, depending on the stitch used. Thinner lines may cause problems with some background stitches.
- Change the slant to match the slant of the line. I use this technique often and I think it looks great when you are making an outline. It does not look as good if it is letters because each time you change directions a small gap is created (think of the look of Four-way Continental to see what I mean).
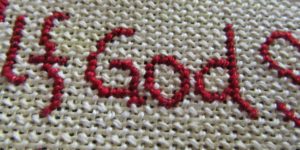
The best solution of all came from a reader of this blog. It’s one I am using in this canvas, detail below.

When the slant is opposite your stitch direction make a longer line going in that direction. Then stitch Tent over it. Is essence what you are doing is making very short runs of Padded Tent, below.

The padding melts into the canvas so the stitches don’t look higher. The effect of this longer, reversed stitch is to connect all those stitches that would give a dotted line without it. The letters end up looking solid and properly formed. As you can see from the picture of my project — it looks great!
About Janet M Perry
Janet Perry is the Internet's leading authority on needlepoint. She designs, teaches and writes, getting raves from her fans for her innovative techniques, extensive knowledge and generous teaching style. A leading writer of stitch guides, she blogs here and lives on an island in the northeast corner of the SF Bay with her family

I would love this piece
Please tell me where I can get it thx
The design s from Cooper Oaks and can be ordered through any needlepoint store.
Keep stitching,
Janet
I am pretty new to needlepoint, thank you for this suggestion! A question…should I do it for all letters, whether or not they’re going in the “wrong direction” so that they all look uniform? Or will it matter? Thanks so much!