Updated January 29, 2019
I turn to the same stitches over and over again, no matter what the project is. These stitches are so flexible that they seem to work on almost any canvas. Change the thread (or even the thickness of the thread) and the stitch changes. Make them in overdyes and get another look.
Here are my Top 5 background stitches. They are pictured below.
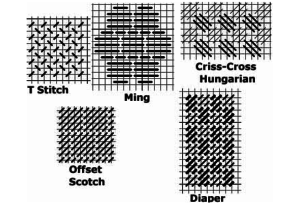
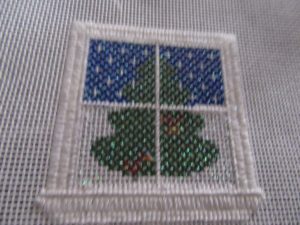
1. T Stitch, this stitch was invented by Tish, one of the founders of Sundance Needleworks. It is a phenominal stitch. It gives light coverage (every other intersection is unstitched). Because it has stitches which slant both ways, it does not have a direction, which means that an area can be any shape and work with this stitch. I use T Stitch so often it’s hard to pick out one piece with it but you’ll find it for the window in the PaintedPony canvas at the top of this article.
The look changes so much depending on the thread you use:
- with a thick thread the open intersections will almost disappear.
- with a thin thread the look will be very lacy.
- with a matching thread the thread the color of the canvas will add texture not color.
- with a hand-dyed or overdyed thread make all the in one direction first, then do the stitches in the other direction.
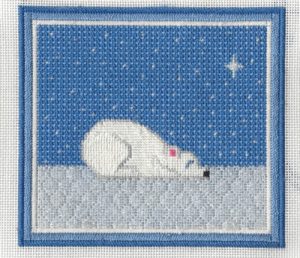
2. Ming, a stitch developed by Brenda Hart, is a very pretty background stitch, especially for rounded areas. I really like its honeycomb shape and it’s so fun to stitch. Because the shape is rounded, it makes a great background when the focal point is rounded. I like its quiet feeling so I also like it as a background for busy designs. I used it for the ice on the polar bear cub below.
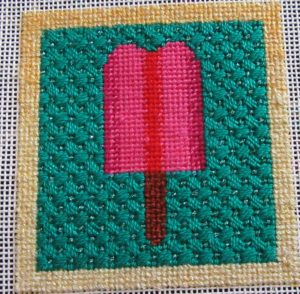
3. Criss-Cross Hungarian, this stitch is another directionless stitch, like T Stitch. It’s little sets of Hungarian stitches which intersect. It leaves single intersections open and these can be filled in with little cross stitches in a different color or thread. I love doing this for night skies. It’s the background in the popsicle for my recent shading class, below.
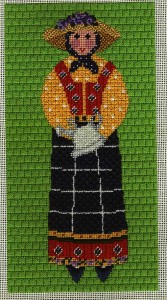
4. Offset Scotch, does away with the problem of Scotch Stitch backgrounds looking too square and boxy. By moving each row one or two threads, the pattern is broken and a great background, which is quick to stitch is created. The pattern is strong, but still works with many designs. The background of this Cooper Oaks Provencal lady, below, stays in the background in spite of the strong color because of this stitch.
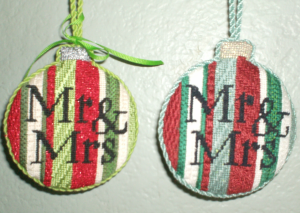
5. Diaper is a stitch made in columns of alternating Mosaic and Cashmere Stitches. It is easy to stitch if you remember to stitch in columns, not rows, and it has almost but not quite a stripe feel. If you want to make the stripes more prominent, try alternating the direction of the stitches in each column, or use threads with the same color but different textures. I like the look of it so much I have made wider versions of it and used it in the Mr & Mrs round & stitch guide, below.
Let me know (by leaving a comment) if you liked this idea and we’ll do more of them.
About Janet M Perry
Janet Perry is the Internet's leading authority on needlepoint. She designs, teaches and writes, getting raves from her fans for her innovative techniques, extensive knowledge and generous teaching style. A leading writer of stitch guides, she blogs here and lives on an island in the northeast corner of the SF Bay with her family

Janet, thanks for writing this article and providing the diagrams. Although I don’t do needlepoint, I appreciate your evaluation of each stitch pattern. It’s made me think a bit more critically about what I do with some of my counted thread work on linen.
Great idea, Janet! Look forward to more ideas!
Oh I love this, Janet!
The stitch I use the most, for almost anything really, is the Nobuko. It fits a small area, doesn’t draw too much attention to itself and is easy to compensate.
I will try that diaper pattern, it looks like it has a lot of possibilities.
I’m with you about Nobuko. It didn’t make my list because it’s probably my favorite stitch for just about anything.
I’ll probably blog about my current project later today and you’ll see how I’m using it in this one.
is it possible to have a larger diagram of the “ming” stitch- I am confused as to how to continue it on!?!?!?
thank you
I don’t have a more extensive diagram of the stitch, but I do have some suggestions for how to extend it.
Stitch one row of complete units at a time. A unit is made up of five stitches, one over two threads, three over four threads and one of two threads. It makes litle ovals.
That would be one set of the little ovals. In each row of ovals the long stitches, which go over four threads meet. The smaller stitches, which go over two threads, form a row which has a stitch, then skips two threads, and then has another stitch.
Once you have your row of units, you will be able to see where the next rows of units fits in. The short top and bottom stitches fit into those blank spaces between the shorter stitches of the previous row.
In general, it’s easier to stitch most needlepoint stitches if you look for the basic “unit” of the stitch. For example, with Scotch Stitch that would be a square. Stitch one unit, then look where the one to the left or right lines up with it. Stitch that unit. Working in this way will make the pattern easier to see.
I especially like T-stitch when using Caron’s Watercolours. Criss/Cross Hungarian is a good one for inserting a BEAD into the one st. space – but I mark these on canvas first to make sure the weft/dip is left for the bead, so it will nestle nicely into the work. The one with the Cashmere stitch – I use a smyrna cross “bump” in that one instead of filling with mosaic – sometimes with a metallic – for interest.
“Double” is another stitch that is great for small backgrounds – I use it a lot on my “crazy quilt” needlepoint pieces. It’s in the Jo Christensen book. That stitch called “diaper pattern” isn’t diaper pattern, by the way.
Janet, I was going through your archived blogs. I would love more of this time of help such as more on what you use in corners, more background ideas, etc. I found this very help. I like the stitch which is the basketweave but you skip every other row both ways. Gives an interesting look. Thanks for the help.
Mary Lou — I like the idea, especially the part about the corners. I’m going to be updating a stitch guide I wrote awhile ago this week and it has some stuff about corners, so I think I’ll put it on the blog, so watch for it.
This is a perfect topic to talk about. Thank you for the great stitch ideas
Totally love this post and would like to see more like this. I like reading the explanation of the stitch too.
so glad I found this website, It’s so helpful when you are unsure which stitch to go with.
Love it.
This sounds good, but I don’t see any pictures, so it is not very helpful.
I will be correcting it shortly. I recently moved servers and this graphic must have been lost. It will be up later today.
Keep stitching,
Janet
I like articles like this, where I learn the history (ie T Stitch) and see an example of it used in a piece. Read every article you put out.
Thanks.
Keep stitching,
Janet