One of the easiest ways to accent an area or to create raised sections is to pad the needlepoint. Doing this puts the visible stitches on top of other stitches and raises them.
There are many different ways to pad, but using layers of Gobelin Stitches is the easiest. Because you probably have the things you need to do it in front of you, it is likely to be the one you use most often, I know I do.
Materials Needed
To pad effectively you’ll need two kinds of thread.
The thread for the pad must be a round thread. The less fluffy it is the better. Pearl cotton is outstanding for padding. Even sizes bigger than you might use for stitching work well. For example #3 pearl was used for the padding on my Jude cross.
The color needs to be close to but does not need to match the canvas and top thread exactly. Because it does not show through the top layer, close works. Because pearl cotton doesn’t come in tons of colors, this is good.
Threads like unplied embroidery floss, crochet cotton, thick linen threads or Pebbly Perle also make good padding threads.
The top layer thread needs to be a flat or ribbon thread and should be opaque. This is not the place to use semi-transparent threads like Water n’Ice or Flair. These threads will show the padding and should be avoided.
Stranded threads can be used if they are plied and recombined into a flat thread.
This color should match the canvas color because it is the one you will see in the finished piece.
Because you are going over padding with a straight stitch, your normal thread may not cover. Either add extra stitches or increase the strands or thickness of your thread.
Padding Needlepoint
The general idea behind padding is that you build up the surface of the area by creating successively larger areas of Straight Gobelins.
Each area is one thread smaller all around than the layer on top of it. It also has stitches that run perpendicular to that layer.
These two hard-and-fast rules are very important because the ensure a great result. The increasingly larger layers of padding mean that your shape will have rounded edges. You padded area will look like a hill, not a cliff. It will look natural and correct, not harsh.
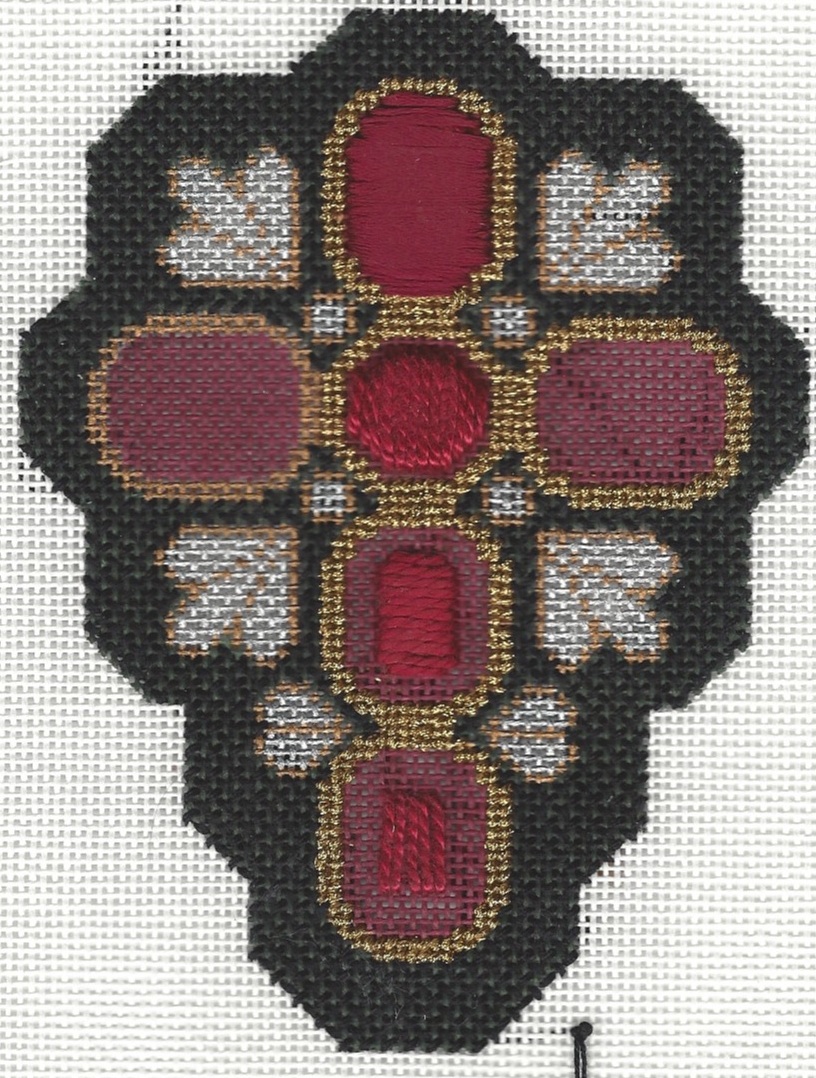
If you have your stitches running the same direction in adjacent layers the stitches in both layers will collapse into each other. Since the point is to build up the height, this is not wanted. As you can see in the lower three padded areas on my cross, the Straight Gobelins in the padding layers tend to be loose. If two layers had stitches in the same direction you could see how you would have a terrible mess.
Padding in Action
When you decide to pad an area, begin by deciding how many layers of padding you want to have. Then decide what direction you want the top layer of stitches to be. On the cross I wanted 3 layers of padding and the top layer would have horizontal stitches.
Once you know these two things you can figure out the size and direction of the bottom layer.
Your size will be one thread smaller all around for each of the total number of layers (four in this case).
To find the stitch direction, see if your total number of layers is odd or even. If the total is odd, your bottom layer will go in the same direction as the top layer. If your total number of layers is even, your bottom layer will go in the opposite direction of the top layer.
You can see in the picture at the top of the post how I built up the padding to make the cabochon. Start at the bottom and follow the padding up the cross. The lowest cabochon has one layer of padding. Above it is one with two layers of padding. The round area at the crossing has three layers of padding. At the top you see the finished cabochon with a top layer of Neon Rays.

About Janet M Perry
Janet Perry is the Internet's leading authority on needlepoint. She designs, teaches and writes, getting raves from her fans for her innovative techniques, extensive knowledge and generous teaching style. A leading writer of stitch guides, she blogs here and lives on an island in the northeast corner of the SF Bay with her family
I like to use Very Velvet for padding because it gives a tiny bit of “grip” to the thread being padded and also because the thread being padded will lay much more evenly over it. Also, you can use it with Water n Ice and Flair – being careful with your color choices – because it is so smooth. It will also nicely shade padded Flair or Water n Ice if you carefully change colors with the Very Velvet being used.
Great tips! I’ll have to try them.
Keep stitching,
Janet