Sponge Painting is one of the easiest methods you can use to apply color and interest to you needlepoint canvas. Today we’ll see examples of sponge painting at three levels of contrast. Then we’ll go over the materials you need. Finally there will be a step-by-step on how to do this.
Levels of Contrast
When you sponge paint, you are adding an irregular layer of color to the needlepoint canvas. Depending on the canvas color and your paint color, this effect can be subtle or dramatic. Sponge painting will always add a certain level of interest, just because of the change in values. Essentially there are three levels of contrast you should consider in planning your sponge-painted background.

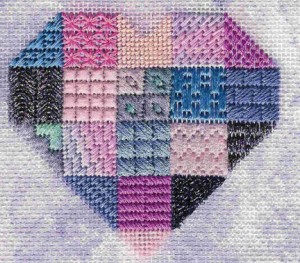
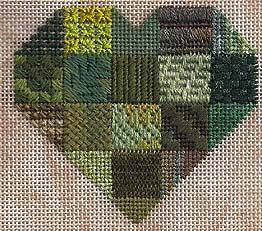
Subtle: If you have ever used Zweigart’s vintage needlepoint canvas, above, you have seen subtle sponge-painting. At this level of contrast, the paint color is the same hue but different in value from the canvas color. Usually the sponging is not predominant. The result is a very subtle look that makes the canvas look aged. As you can see in the heart immediately above, the result is quite pretty.
Color Change: At this level of contrast, seen in the heart at the beginning of the article, the color used is different from the canvas color, but the value change is not extreme. In addition the sponging is done extensively so that the background is nearly solid.
This level of contrast changes the background color. almost as if you had a new color of canvas. The sponge-painting technique. however, creates different levels of the new color and allows the canvas color to show through, creating a textured background.

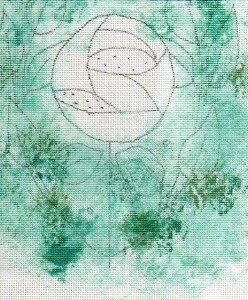
High Contrast Sponging: In this rose you can see the most bold form of sponge painted background. It is not subtle for many reasons:
- There is a greater variation in values in the sponging.
- The color of the paint has a greater contrast to the canvas color.
- The sponging is done less uniformly.
- More than one color is used for the background.
This kind of background will need bold colors and strongly textured stitches in order to keep the background in the background.
This is a very bold technique and you should probably experiment with smaller pieces to see how it works with your stitching.
Materials Needed for Sponge Painting
In order to start sponge painting a needlepoint background, you will need:
- your unstitched needlepoint canvas
- acrylic paints
- a small natural sponge
In addition it will be helpful to have paper towels, a foam plate, and blank newsprint.
Natural sponges are critical for sponge painting success because they have larger holes of different sizes. Natural sponges are a dark, dull gold and can be found in craft and paint stores. If you can only find larger sponges, you can tear (not cut) them up to the size you want.
You can use any kind of acrylic paint you like. If you are painting just for yourself, the hobby paints that come in bottles at the craft store are an excellent choice because there is a huge range of colors and the paints are close to the right consistency. If you are comfortable mixing paint colors, consider artist’s acrylics in tubes or jars. These paints have more pigment in them, but they will need to have colors mixed and to be thin ned with water to the right consistency.
Sponge Painting a Needlepoint Background How-to
To sponge-paint place your needlepoint on a sheet of blank newsprint so that excess paint goes on the paper. I like newsprint instead of newspaper because some inks can get onto your canvas.
Squeeze out some paint onto the foam plate, palette, or other surface. If your paint is not the thickness of cream, thin it with some water. Getting your paint too thin will cause your canvas to get wavy when dried. Then it will need to be ironed flat.
Dip your sponge into the paint by going up and down in a straight line.
Having too much paint on the sponge will only clog the canvas holes. Prevent this by dabbing the sponge on paper towels or newsprint until the sponge has very little paint on it.
Apply the paint to the canvas by bringing the sponge straight down onto the canvas, pressing it gently, and then bringing it straight back up. You may be able to do this several times.
Do not try to move the sponge while it is on the canvas, that will only smear the paint.
When doing a background, the painting needs to go all the way to to edge of any design. If it’s a line drawn canvas, see the picture above, you can sponge into the edges of the design. If it has no design on it yet, as in the picture at the top of the article, you can do the entire piece. If you are doing the background of a painted canvas, you can put a piece of paper over the painted area to mask it.
Let dry absolutely flat overnight before stitching.
About Janet M Perry
Janet Perry is the Internet's leading authority on needlepoint. She designs, teaches and writes, getting raves from her fans for her innovative techniques, extensive knowledge and generous teaching style. A leading writer of stitch guides, she blogs here and lives on an island in the northeast corner of the SF Bay with her family

I understand sponge painting, but how do you stitch the backgrounds then when they are
multicolored?
I’ll talk about some approaches for adding stitches to this kind of background next week, but essentially you don’t stitch it. That’s the reason for doing surface effects, so that you have a background that is decorative but that doesn’t have to be stitched.
You should not plan on using these techniques if you plan on creating a completely stitched background. Any stitching used would have to be very open or light so that the decorative background showed through.
Keep stitching,
Janet