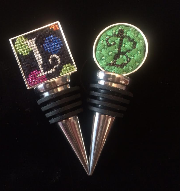
Awhile back I received a generous selection of products from Point2Pointe. I wrote a first look article about them (read it here). After that I got stitching. The products are great and the resources for finishing them are really helpful.
While easy to finish, there are many things you can do to make your results better.
Threads and Stitches
Not every thread you have in your stash will work for these items. Metallic threads are a particular problem. That’s because the needlepoint needs to be flexible along the edges. Because many metallic threads are hard, they create a stiff edge that cannot be manipulated. Softer metallics such as Soft Sheen Fyre Werks or regular Kreinik braid make good choices. The stiffer kinds of Kreinik (holographic, glow-in-the-dark and cord) should be avoided, except, possibly, in the center.
Small items benefit from threads with different textures. By choosing different threads, you can get lots more variety in your piece. One project I stitched, a pendant, used 2 cottons, 2 silks, and a metallic. Each color was in a different thread. It adds some nice variety.
Small spaces call for small stitches. This does not mean you should only use Tent. Using stitches that cover no more than three intersections will work well. You should also be careful of how much thread is on the back. You can stitch happily with normal coverage on back, but avoid stitches that are “yarn hogs” or that have lots of thread on the back.
Finish all your threads inside the stitched area. The sides will be trimmed closely, so overhanging threads will be cut. Finish threads by pulling them through the back of other stitches.
Finishing
Look at the detailed instructions you’ll find in the resources section below. They give great results but here are some tips to make your project look even better.
Use only a thin layer of glue. The Turbo Tacky Glue from Amazon has a small point. It’s tempting to use lots of glue. A better choice, though, is to use a little bit then spread it out as far as you can on the back, not the sides. Using more glue can cause glue to seep through the front of the needlework or to creep up the sides and show on the front of the finished piece.
Carefully choose your glue. Two recommended choices for glues are Turbo Tacky Glue and ES-6000. Tacky Glue is a white glue and therefore water soluble. You can easily peel it off your fingers. ES-6000 is a super glue. It adheres very quickly and can be stringy. It will not clean up with water.
Cut your needlework so the unstitched sides just meet at the back. Because there is no padding used in these items the folded over sides not only create clean edges, they also become the padding. Where there is no canvas behind, the needlepoint sinks. The sides will be higher because they have two layers because of the folded-over canvas.
Resources
The finishing section of the company’s site has links to outstanding video tutorials for finishing square and round items as well as the cuffs. They are hosted on YouTube and are fantastic.
In the December/January newsletter, Amy Bunger had an article, with illustrations, showing you how to finish a bottle stopper. Because the method is the same for other square and round items, its a great tutorial.
They are definitely items you should consider when looking for needlepoint gifts.
About Janet M Perry
Janet Perry is the Internet's leading authority on needlepoint. She designs, teaches and writes, getting raves from her fans for her innovative techniques, extensive knowledge and generous teaching style. A leading writer of stitch guides, she blogs here and lives on an island in the northeast corner of the SF Bay with her family

Janet – thank you for the wonderful blog post. Many thanks. Looking forward to TNNA San Jose. Come see me at booth 1136.
Will do.
Keep stitching,
Janet