Updated October 18, 2019.
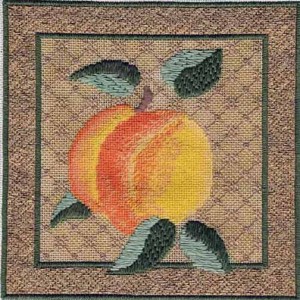
A few years ago I was helping a stitcher with a charming stocking she was making for her chef husband. There is, of course, an apron and chef’s hat and they would be most effectively done in shading. But she’s never shaded before.
This got me thinking that I should share my easiest shading technique with you, I call it “divide and conquer” shading. It can be used effectively where you need only a slight transition or where you need extensive shading. Try it on something small and you’ll be so happy with the results you’ll use it often. Even if you are a beginner, you can use this technique, all you need to know is one form of Tent Stitch and be comfortable stitching with a stranded thread (i.e. floss).
First off, only shade with plied thread, this shading depends on mixing plies of two colors in the needle, so non-lied threads won’t work. My favorite choices are cotton floss and stranded silk.
Look at your canvas carefully. You will see that there are large areas which are solid colors, with smaller areas of transitional colors between them.
Buy threads for each of the solid colors. You may find that one or more of the “solid” colors doesn’t exist in your thread. That’s OK, you can use a blended color for that area as well.
But let’s assume you’ve found all the solid colors. Start stitching as you normally would, each of these solid areas. Do not make the edges of this area straight lines, unless they are something like a seam or something which really is straight in real life. By varying the edge slightly (never more than three stitches in a row), the eye will blend the colors better.
Continue in the way for each of the solid areas, BUT (and this is the important thing) do not stitch all the way to the edge of the adjacent solid area, always, always leave at least one thread open. You can use the painting on the canvas to determine how many threads to leave open.
These are the areas where you will use the blended thread. If there are only one or two threads open in most of this area, you will use only one blend, a 50/50 blend of 50% Color A and 50% Color B. If there are three or more threads open in most of this area, you may want to use more than one blend.
To make several blends you will need to vary the amount of each color. For example if you were using four strands of cotton floss, you could make three blends, AAAB, AABB, ABBB. You could use each of these blends in an area with three threads open.
If you were using six strands of silk, you could get five blends: AAAAAB, AAAABB, AAABBB, AABBBB, ABBBBB. If you only had three threads open, you might chose three of these shades: AAAAAB, AAABBB, and ABBBBB.
By shading this way, you get a soft gradual transition between the colors. It’s easy to do because it only changes your normal method of stitching a little bit.
I found something in my stash I started about 10 years ago, which required extensive shading. I had never finished it because I didn’t use this method then. But now that I do the design was stitched in a couple of days, right after New Year’s when we had a house full of people. So I know it is easier than many other methods of shading. You can learn shading yourself with either my Shaded Popsicle kit & class (only one available), or my Shading Techniques class. Follow the links to find them both in my Etsy shop.
About Janet M Perry
Janet Perry is the Internet's leading authority on needlepoint. She designs, teaches and writes, getting raves from her fans for her innovative techniques, extensive knowledge and generous teaching style. A leading writer of stitch guides, she blogs here and lives on an island in the northeast corner of the SF Bay with her family

I tried to use the shading/blending technique, but I am doing something wrong. When I try using multiple threads, striations appear. So one of my blending threads shows and the other one(s) don’t.
I can’t really tell from your description what the problem might be. Would you be able to contact me directly through the contact form so we can work this out?
Keep stitching, Janet