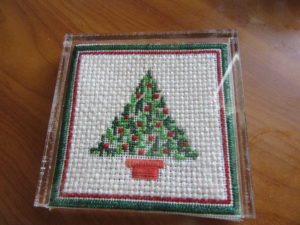
A few months ago I bought self-finishing coasters from several companies. Because these acrylic coasters from Cooper Oaks needed 4″ squares of needlepoint, it took me awhile to find a piece to finish in them. These coasters are incredibly easy to finsh, may not require even glue, and are really heavy duty. In this article I’ll talk about the coasters themselves, then about how to use them.
The Coasters
The coaster is made from heavy clear acrylic that’s a bit under 1/4 inch thick. The coaster is a hollow box with one open side. Althugh this makes it about 3/4 inch tall, the acrylic on bottom and top makes it useful for both hot and cold drinks. The open side is a drawback, but the needlework should be protected unless your drink sweats a great deal.
Because of the thickness of the acrylic, the coaster is 4.5 inches square, which is generous, but not too large.
Then opening for the needlepoint is 1/2 inch. This is wide enough so that your finished needlepoint can slide in easily, but not so wide that you will be able to get your fingers inside tp adjust it.
The biggest problem with these coasters is that they are completely clear. This has serious implications for how your treat your needlework when finishing the coasters.
Finishing the Cooper Oaks Coaster
With this coaster you will need to be sure your needlepoint is an exact fit and square (i.we. stitched on a frames and/or blocked). If your needlepoint is smaller it will be diificult to place it in the center. Because the needlepoint is not attached t the coaster inany way, you will not be able to keep it in place once finished. Always test fit the needlepoint before starting to finish.
The clear sides and bottom also have implications for the sides and back of your pieceas well.There will need to be something covering the back. This could be some decorated paper. Origami papers are lovely and come in squares about this size. Scrapbook papers are another good choice. You’ll want to cut a 4-inch square of your paper. It may need to be trimmed in order to fit. I found it easiest to do the after the needlepoint was placed.
The clear sides of the coaster mean you’ll need to finish the sides of your needleppoint before inserting. This can be done several ways:
- After stitching, cut out five threads beyond the stitching. Glue the unstitched edges to the back, using Alene’s Turbo Tacky Glue. Let dry under a weight.
This method might leavea thin band of unstitched canvas all around.
- Before you stitch cut your canvas five threads beyond the finished area and turn these edges to the back. You will have to stitch through two layers and stitch in hand. Very little canvas will show on the sides.
- You can finish after stitching. Cut the canvas five threads wider than the area all around, turn under this margin so only one thread shows on top and there is a hole on the edges. Stitch Binding Stitch, below, all around. Thiswill show no unstitched canvas but it does result in thicker edges.

Once your needlepoint edges are finished, put it under a heavy book to flatten it. Then just slipp it into the coaster. Add the paper underneath it and you’re done.
About Janet M Perry
Janet Perry is the Internet's leading authority on needlepoint. She designs, teaches and writes, getting raves from her fans for her innovative techniques, extensive knowledge and generous teaching style. A leading writer of stitch guides, she blogs here and lives on an island in the northeast corner of the SF Bay with her family

I love the Christmas coasters. Where can I find them?
This was a vintage canvas I found on eBay. The designer of it was not identified. I amworking on a delightful set of 3×3 cesigns from Little Bird that would be perfect Christmas coasters. The stitch guide for them will be out by the end of the year.
Keep stitching,
Janet
Do you recommend any particular acrylic coaster for the finishing?
The coaster I used wasn’t identified, but I believe it came from Cooper Oaks’ acrylic line.
Keep stitching,
Janet