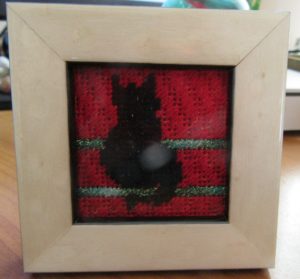
A year or so ago, these two artists collaborated on an interesting and fun needlepoint product — mini-kits. aThese are small (2″ square) projects that come packaged with a frame for finishing in a clear bag. The kit includes a painted canvas, a basic instruction sheet, and the frame packaged in a box for giving.
If you want a quick gift to finish yourself, you have it. If you want a charming present for a stitching friend, add threads and a needle to the bag and everything you need is there.
When the kits first came out most of the designs were small motifs on a white background. Newer designs have the entire space painted, as you can see from the picture above. The background of this cat was originally orange and white for Halloween, but I turned it into a Christmas cat.
Because the canvas is cut to 5″ square, the design is easy to mount on stretcher bars and stitch. When I made one of the initial kits e about an hour to stitch. This design took about four, largely because the background stitch was new to me.
The frames are high quality with wells deep enough for the needlepoint. They include a thin piece of plastic as the “glass” and a piece of foam to fill the space between needlepoint and backing. Although different frames might fasten differently, this frame had a back secured by one tab. It was attached to the bottom of the frame, so it opened like book. The frame has an easel back, making it designed to sit on a shelf or table.
It was incredibly easy to assemble and took about five minutes. The finishing instructions point out the one flaw in the kits. The instructions give diagrams, but no explanation of Basketweave and Continental. The bog problem is the framing instructions. They tell you to trim the canvas and leave two extra threads around the stitches. In this case at least, if I had done that my needlepoint would be too big for the frame. If I had gone ahead and inserted it, it would have puffed out, making it impossible to use the glass and leaving far too much empty space in the back.
You will have much better results if you use the logo insert to trim your canvas. Place the paper on the canvas. In this case it was exactly the same size as my stitched area. It might be those extra threads bigger in yours. Whatever the case is, center your canvas on the paper and use that as your guideline for trimming the canvas.
If your needlepoint is the same size as the paper, trim in the first row of holes outside the stitched area.
Once trimmed, test fit the needlepoint to check it. Remove the needlepoint, out in the glass if desired, then the needlepoint and foam. Fasten the back and you’re done!
Next week we’ll learn how to make your own mini-kit designs.
About Janet M Perry
Janet Perry is the Internet's leading authority on needlepoint. She designs, teaches and writes, getting raves from her fans for her innovative techniques, extensive knowledge and generous teaching style. A leading writer of stitch guides, she blogs here and lives on an island in the northeast corner of the SF Bay with her family

Where do we find these mini-kits? I couldn’t find them on the internet. Thanks!
They are not on either Brenda’s or Victoria’s sites.
I bought this one from Louise’s Needlework in Columbus. The first one was, I think, bought from The Needlepointer in Seattle. However they could be ordered through any needlepoint shop.
Keep stitching,
Janet
Thank you for writing about my 2×2 canvas/frame sets. They are available through needlepoint shops. You can see the entire line on my website http://www.patriciasone.com
You’re welcome.
Keep stitching,
Janet