Today we have a guest post from Needlepoint for Fun.
***********
Compensating stitches are those partial stitches you use to finish off a row of specialized (non-tent) stitches when there aren’t enough canvas holes left in the row for you to complete the stitch. I guess it’s the needlepoint equivalent of squeezing a square peg into a round hole – except that by using compensating stitches you can actually do it.
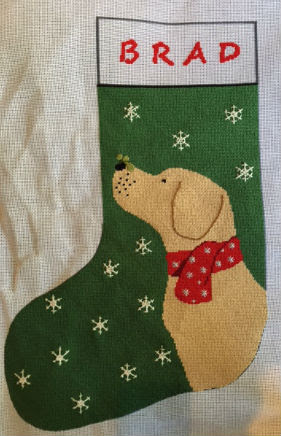
I’ve been stitching this stocking, above, and, boy, was there a lot of basketweave on here.
So, after all this basketweave, when I got to the top I was in the mood for something different. I decided to stitch the top band in Scotch Stitch.
I started counting canvas holes to see if I had the right number across to fit in a row of complete Scotch stitches. I didn’t – the Scotch Stitch is worked over 3 canvas intersections and I had something like 110. So, I knew I was going to have to compensate, and the question then was, “How?”
The most important thing to consider when compensating is that you want to retain the overall look of the stitch. In other words, you don’t want the compensating stitches to draw the eye and/or confuse the pattern of the stitch. This is important because you need to know where on the canvas to start stitching if you know you’re going to have compensating stitches.
So, this is the information I had that I needed to consider:
- I had 110 thread intersections that was not divisible by 3 (the number of intersections across that I needed for a Scotch Stitch). So, I knew I would have compensating stitches.
- I was going to be using a diagonal stitch within a straight sided, geometric area that was broken up in the middle by a name.
- This would be finished as a stocking which meant a few millimeters on all sides would be incorporated into the finishing. This is important because it meant if I placed my compensating stitches where there would be a seam allowance they probably wouldn’t even appear. In contrast, I knew to avoid placing the compensating stitches at the bottom of this band where they would surely show and distract the eye.
So, armed with this information I thought, “I should write an article for the newsletter about compensating stitches.” After all, I’m always looking for topics to write about. So, I began doing just that. Thankfully, I hadn’t gotten very far when the next light bulb went off. “Idiot!” I said to myself. Why would you write what has already been written, quite brilliantly, by people far more skilled and knowledgeable than you?
So here’s what I did, which is what I always do when I’m going to need compensating stitches, and what I recommend you do, too…
Consult an expert. This link takes you through to a brilliant series of articles on the American Needlepoint Guild website, written by Tony Minieri, on everything you might ever need to know about compensating stitches. It talks about compensating with straight stitches, diagonal stitches, stitches that have to line up against a curve, against a straight line, within an irregular space. You name it, it’s probably covered.
Of course you should feel free to browse around this comprehensive set of articles now, but to be honest, the best advice I can give you is to bookmark this page and come back to it later.
How much later? The next time you have an area in which you will be placing specialized stitches, go to the articles, find the information on the type of stitch and canvas area relating to where you are stitching, and read up about it. There’s a lot of technical stuff here and if you’re anything like me you won’t retain much of it by reading it as an intellectual exercise, but you’ll certainly find it useful the next time you want to decide where on your canvas to start that Florentine Stitch you’re dying to put in the middle of your canvas where everyone will see it.
Thanks for reading and happy compensating!
Brenda
About Janet M Perry
Janet Perry is the Internet's leading authority on needlepoint. She designs, teaches and writes, getting raves from her fans for her innovative techniques, extensive knowledge and generous teaching style. A leading writer of stitch guides, she blogs here and lives on an island in the northeast corner of the SF Bay with her family

Unfortunately, the ANG resource is no more. I found parts 1 and 2 on the Way Back Machine, but I can’t find any trace of parts 3 or 4.
ANG made major changes to their website awhile ago. The best thing to do is to contact ANG & express your feelings.
Keep stitching,
Janet