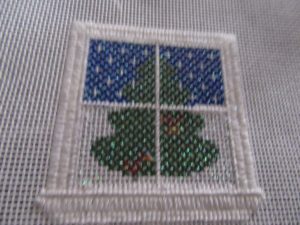
A easy and great way to showcase a square or rectangular needlepoint landscape is to turn it into a view out a window. In the past I have seen these from time to time. The ones I saw always seem to involve two layers of canvas with stitching on both and complicated stitching techniques.
Instead of this I wanted something that would act as a frame and showcase the view but was simple enough for any stitcher to tackle. This process accomplishes this. First you stitch the window itself. Next you create the frame for the window. Finally, if you wish, stitch the wall around the window.
We discussed how to stitch glass in a previous post. Here I used white Nordic Gold for the glass and stitched it in T Stitch. The dividers for the panes are stitched in Tent Stitch. While often modern windows are a single pane, your viewer will understand the idea of a window better if you have panes.
Different styles of windows have different kinds of divisions. Look at pictures of houses and windows to see them. I divided my window simply into four panes.
Windows can look very different on the inside too. They can have wood or marble windowsills. They can have simple or elaborate mouldings. They can have corner blocks at the upper corners or have none at all. Once again, look at pictures of houses, particularly older ones, for ideas.
I decided to do a fairly simple moulding with corner blocks. The side and top moulding have ridges. These are indicated by the different rows of stitching. There is a narrow inside ridge of Tent Stitch, marking the outer frame of the window. This is surrounded by the moulding itself, which is two wider ridges of Upright Gobelin over two threads, below.

The corner blocks are Scotch and Reverse Scotch pointing towards the window.
The windowsill is more complex. In order to look realistic it will need to be wider than the window + the mouldings. It will also need to have a narrow line that is higher than the surrounding moulding for the sill. Below the sill the moulding gets progressively narrower but is never narrower than the window itself.
My bottom moulding has four rows. The top row, which extends to one thread beyond either side of the mouldings is Padded Tent, below.

Below that I made a row of Upright Gobelin over three threads. In order to create the diminishing edges of this moulding I began with a Straight Stitch over 1 thread at the ends, then did an Upright Gobelin over two next to it. The third stitches from either end begin the full-length Upright Gobelin.
I finished the bottom moulding with two rows of Tent Stitch, each one stitch shorter on the ends than the previous row.
See how easy it is to stitch a pretty window that uses simple stitches to create a framework for the design.
About Janet M Perry
Janet Perry is the Internet's leading authority on needlepoint. She designs, teaches and writes, getting raves from her fans for her innovative techniques, extensive knowledge and generous teaching style. A leading writer of stitch guides, she blogs here and lives on an island in the northeast corner of the SF Bay with her family

Very realistic looking. Thanks – I’ll file this away for a future project.