Updated November 2, 2018
It’s easy to make and finish a round initial ornament such as this one.
Begin by finding a Lee Needle Arts round luggage tag. You can also use their round ornament, but I like the many colors of the tag.
You will also need:
- 18 mesh mono canvas
- pigma marker
- overdyed thread
- background thread
- one thin & one thick metallic to coordinate or contrast with overdye
- ribbon
- letter enlarged to fit 2 3/4″ circle
Begin by finding your letter, there are lots of alphabet sites out there and many books of fonts. This A is from a book called Illuminated Initials. I enlarged it to fit the space.
Use the template and your pen to trace both the circle and the letter centered inside it.
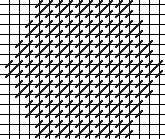
Use your overdye to stitch the letter in a textured stitch. I used Staggered Mosaic, below.

Once this is stitched, pick another stitch for the background and stitch it in your background thread. I used T Stitch and cream matte #8 metallic.

Once the background is complete, you want to accent the letter
with Whipped Backstitch and the other two metallics. These colors do not have to match, mine didn’t.

Begin by making Backstitch all around the ornament with the thicker metallic. These stitches should go over two threads and be right along the edge of the letter. The metallic I used, Kreinik #12, is very close to the green of the overdye.
Once the backstitch is complete wrap it with the thin metallic, Sparkle Braid here. Bring your needle out under a backstitch and emerge on one side, bring the needle over the first stitch and under the second, re-emerging on the first side.
Continue to wrap like this, without your needle entering the canvas until the outline is wrapped.
To end a thread, bring your needle to the back as it goes under a stitch and start the new thread in the same hole.
Trim and insert into the tag. To make it an ornament, hang it with a ribbon. Tie a knot and then a bow over it in a thin but pretty ribbon making a loop. Thread the opposite end of the loop into the hole at the top of the tag. and pull it through a bit. Bring the bow end of the loop through the loop end and pull it tight. This is called a Lark’s Head Knot and is a perfect hanger for your charming ornament.
About Janet M Perry
Janet Perry is the Internet's leading authority on needlepoint. She designs, teaches and writes, getting raves from her fans for her innovative techniques, extensive knowledge and generous teaching style. A leading writer of stitch guides, she blogs here and lives on an island in the northeast corner of the SF Bay with her family

Leave a Reply