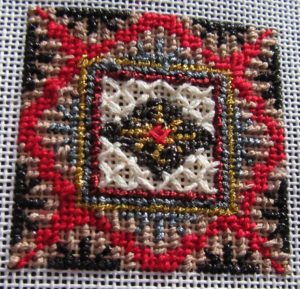
This Mindy Mini, canvas 1T, presents a charming Japanese family crest in the center in a very typical color scheme of neutrals, black, red, and gold. I used it as a showcase for several different finishes of Kreinik metallics.
After the material list, we’ll talk about these different finishes. The stitch guide is simple and follows.
Materials
- Mindy Needlepoint Canvas 1T
- 1 skein DMC floss 321 (red)
- 1 spool Kreinik #12 Metallic 005L (shiny black)
- 1 spool Kreinik #12 Metallic 005HL (black)
- 1 spool Kreinik #12 Metallic025 (gunmetal)
- 1 spool Kreinik #12 Metallic 5550 (tan)
- 1 spool Kreinik #12 Metallic 003V (red)
- 1 spool Kreinik 1/16″ Metallic Ribbon 321J (gold)
- 1 spool Kreinik 1/16″ Metallic Ribbon 5555 (cream)
Metallic Finishes
Kreinik makes metallics in many different finishes. You can use these, as you can see, to create variety in your piece. The different finishes are distinguished, for the most part, by suffixes after the color name.
Colors in the series beginning with “555” are matte metallics. Here two of them are used for the backgrounds. While they do pick up a bit of light, they play really well with non-metalic threads. They are the only finish I recommend for stitching backgrounds unless those backgrounds are very open.
Colors that have “V” after the color number are vintage metallics. They have an older, slightly tarnished look when compared to the regular color. The amount of difference depends on the color. In general though, they are both darker and more dull than the same color without a suffix.
If a color has no suffix, it is Kreinik’s regular metallic.
Colors with HF after the number are high lustre. These threads have twice as much metallic in them than regular metallic. In most cases, this doesn’t change the color, but only makes it shinier. In some cases there is a clear difference between regular and HL colors.
Colors with J after the number are Jap colors. They include both regular threads and Jap threads As we learned yesterday Jap metallics are created differently from Kreinik’s regular metallics. If the thread is sized and labelled as a regular metallic but has J after the number, that indicates that the color is similar to the same color in the Jap threads, which are sized differently. Jap gold, used here, is the brightest non-holographic gold.
Colors with L after the number are holographic. They are very shiny having some Mylar in them.
Not used in this piece are the glow-in-the-dark colors. They have the letter suffix “F.” There are also colors with a “C” suffix. These are cords which are stiffer than regular metallics.
Stitch Guide
The project is mainly stitched in Tent Stitch.
Stitch the center medallion, except the red, in Tent, using black holographic and Jap gold metallic. Stitch the red in Woven Cross, below, using four strands of red floss. Remember that to get the woven look, the last stitch goes under the first stitch.
 Woven Cross, copyright Napa Needlepoint[/caption]
The background of the medallion is stitched in Giant Four-way Continental, below, using cream metallic. Each half of the center is stitched separately because they do no meet.

Stitch the red and gold borders in Tent using red and gold metallic. Stitch the black border in Reverse Tent using gunmetal metallic.
Stitch the red in the frame in Tent using four strands of red floss, except for the extensions in the upper left anf lower right. Stitch these in Reverse Tent to get solid lines.
The black motifs are all stitched the same way. Stitch them in Tent except for the diagonal line that slants towards the upper left. Stitch that in Reverse Tent to create solid lines. The four motifs that touch the center are stitched using gunmetal. The motifs around the outside edge are stitch using black.
Stitch the background for the frame in Open Continental Stripe, below, using tan metallic. This stitch has columns of Continental separated by columns of open canvas. These stripes will always match the direction of the center line of the motif: horizontal on the sides, and vertical on the top and bottom.

The background for each motif is centered and stitched separately. The first stitches continue the center line of the motif to to the red framework. From there, complete the background using this stitch. Be aware that these areas are not all the same size. By stitching the center row first, you will place the background correctly in all areas.
About Janet M Perry
Janet Perry is the Internet's leading authority on needlepoint. She designs, teaches and writes, getting raves from her fans for her innovative techniques, extensive knowledge and generous teaching style. A leading writer of stitch guides, she blogs here and lives on an island in the northeast corner of the SF Bay with her family

Hello, Janet,
I would like to email some photos of needlepointed chairs to you, including the Caleb Gardner chair in the Metropolitan Museum of Art.
Is there an email address I can use or shall I do it via Facebook?
Martha in CWV
Email is bet because I’m not good at Facebook. Just send it to the address on the contact page (link at the top of every page).
Keep stitching,
Janet