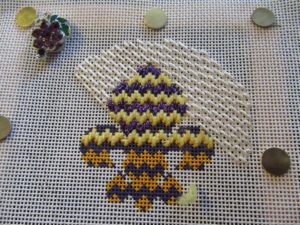
If you love Bargello Needlepoint, as I do, then it’s hard to ignore Painted Canvas Bargello. It has the wonderful patterns you love. You see one and you hear them calling to you. If you are like me you have often found them frustrating.
If you look at the bottom of the Fleur de Lis pictured above you’ll see why. Canvases are always painted so that the color is on lines and intersections. That’s great when you are stitching Tent or other diagonal stitches, but it poses problems when you are making straight stitches.
That’s because straight stitches don’t go over intersections, they go from hole to hole over lines. When looking at painted canvas Bargello, your stitches will be between the colored lines.
Analyzing the pattern
In order to stitch these canvases successfully as Bargello, you’ll need to do some thinking, Look at the pattern and consider how it moves:
- How many steps are there in each leg?
- What’s the jump between each step?
That gives you two of the three things you need to know to create a Bargello pattern from your painted canvas. The final step is knowing how long the stitches should be. To figure that out, look at one line of the painted Bargello — how many lines does it cross? That’s an excellent place to start for stitching your Bargello.
Making the First Line & Stitching the Design
Armed with your knowledge of the pattern, stitch a test line. It should be the lightest color in the pattern. As soon as you decide to do this, you’ll see a second problem: where are the peaks and valleys?
In the painted canvas a thread is always the peak or valley. But we’re stitching in holes, not across the thread intersections. That means that one thread could have two stitches side-by-side, exactly the same. Doing that, however, would change the pattern.
That’s where the major frustration sets in. You are just going to have to pick a side. Start to stitch at a peak or valley, pick one side of the painted thread to have the stitch and follow the pattern you analyzed from there. The lowest yellow line shows how this looks.
If you look at it closely, you will see that the thread does not cover completely. That’s why we started with the lightest color. Darker threads will cover those bits of paint showing through.
Stitch the lightest color completely. Continue color by color until you have stitched the design (top of pattern on picture).
The Problems with Edges
Following these steps will get you most of the way to success with painted canvas Bargello, but you may find it hard to stitch the edges of the design. This is another problem that occurs because you are using straight stitches.
If you have a diagonal stitch, you can easily make a stitch over one intersection. With straight stitches though, a stitch over one line is often unstable and can get lost under a canvas thread. Your stitch may have areas where this happens. When it does, you’ll have to make a decision about whether to have stitches over one thread.
If you do not, you’ll need to have fuller coverage stitches around it to cover any painted canvas that shows.
By careful planning, you can make any painted canvas Bargello look great.
About Janet M Perry
Janet Perry is the Internet's leading authority on needlepoint. She designs, teaches and writes, getting raves from her fans for her innovative techniques, extensive knowledge and generous teaching style. A leading writer of stitch guides, she blogs here and lives on an island in the northeast corner of the SF Bay with her family

I love the background! Can you please tell me what stitch that is?
It’s a diagonal darning pattern from the DARN IT! chapter of Amy’s Cookbook for stitchers. It’s called Diagonal Rain.
Keep stitching,
Janet