Planet Earth makes a round version of their travel jewelry boxes and it’s a real winner. The interior of the 5″ leather case is padded and lined in the same black-and-white striped fabric as the square case (reviewed here), but unlike the compartments of the square case, this one has a small striped drawstring bag and opens completely, like a clamshell.
That makes it more generally useful. I could easily see it being used as a storage case (non-travel), for a man, or, my plan, to use it as storage for cables when I travel. There are leather tabs on both ends of the sturdy zipper, making it easy to open. It is currently available in three colors: blue, lime, and grey. I hope they expand the color selection soon, I’d love to see it in black, red, and aqua as well.
The opening is 3.75″ round. Because this is not one of the more common sizes of rounds, you’ll need to make your canvas selection for it carefully. If you are using a canvas that is 3″ round, you will need to stitch extra rows. If you are using a canvas that is 4″ round you will need to leave off some rows. If you are creating your own canvas, find a 3.75″ round and use that as you template.
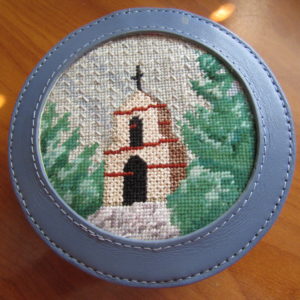
From bitter experience I know how critical this is. Initially I used a 4″ circle as my template and the finished needlepoint was too big. In spite of trimming, I could not get it to the right size and placed straight in the opening. The mission you see pictured was my second try. Because this canvas was exactly 3.75″ in diameter, it fit perfectly and easily. Because of this difficulty, I would love it if the manufacturers include a paper template inside the case. Even if it had to be folded it would be a huge help.
Inside the case you’ll find a card with finishing instructions. They are short, but have some good advice. Before you begin working with the case, trim your needlepoint leaving 2-3 rows around the stitching. Planet Earth uses a very sticky adhesive and trimming before you work with the case will make your life easier.
To finish, loosen the leather all around with your finger and remove the protective paper. Because there is not a slot for starting this, you’ll have to use your fingernail to get it started, but the paper comes off easily.
Place the needlepoint on top of the opening, making sure it is straight in the opening. Do not press down. Using you finger, loosen the leather edges (they have probably stuck to the adhesive) and tuck in the margins as much as possible. I was able to do this almost all the way around. If you are not, use something blunt, such as a butter knife to tuck in the edges. Once you have the edges tucked in press from the center to the edges.

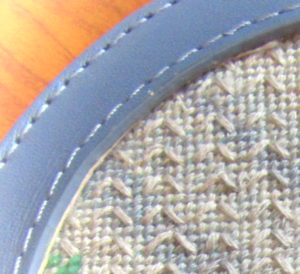
You may find, as I did, that your needlepoint is firmly attached. Pressing, however, helps secure both the stitching and the leather edges. This creates a firm finished look. As you can see by the picture, even without glued edges, the case looks great.
About Janet M Perry
Janet Perry is the Internet's leading authority on needlepoint. She designs, teaches and writes, getting raves from her fans for her innovative techniques, extensive knowledge and generous teaching style. A leading writer of stitch guides, she blogs here and lives on an island in the northeast corner of the SF Bay with her family

Leave a Reply