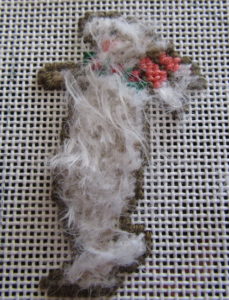
I recently received samples of Rainbow Gallery’s newest thread, Rainbow Eyelash. I used it to stitch the fur of the folk art bunny, above. As you’ll see in the stitched sample below, this thread has extremely long hairs. In fact, the hair was so long that you could not see details on the figure. The picture above is after the fur had been trimmed considerably.

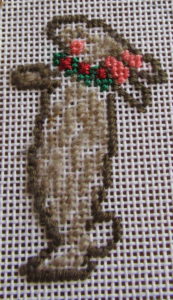
Just to give you an idea of how much detail was lost, the picture above is the bunny before the Eyelash was stitched.
The thread is available in six colors. White was used on the bunny and off-white in the samples; the other colors are mostly natural colors. The thread is 100% polyamide and comes on 8-yard cards. That’s not lots of yardage, but this thread is very attention-grabbing, so you will be likely to use it only in small spaces.
In construction, it is a chainette (a chain of crochet stitches), so it can unravel. That’s the first problem. Because it is so hairy with hairs up to an inch long, it can be hard to tell the unraveled core from another hair.
The long hairs make this thread very difficult to get into the needle. I found that I only could do so by using a needle threader.
I found that stitching with Rainbow Eyelash was a very slow process. As I stitched I discovered several tips that will make stitching with Rainbow Eyelash easier
How to Work with Rainbow Eyelash

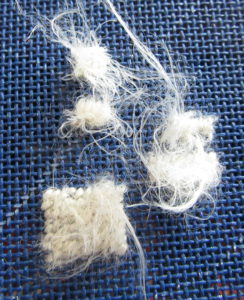
The picture above is of four small samples I stitched using Rainbow Eyelash. I picked a light color on a dark canvas so it was easier to see. All the samples were stitched with a single strand.
In the bottom left (the biggest square) is my initial sample. The left half was stitched with no special treatment. As I stitched I noticed that the hairs were getting caught in the stitches. For the right half, I stopped after every stitch and pulled the hairs free.
As you can see there is a considerable difference in the length of the hair. The hair on both sides would be even longer if I had used a brush. The shorter hair doesn’t look much different than other, less hairy, threads, so it probably is not worth the hassle.
The remaining samples were all stitched with the technique of pulling the hairs to the front after every stitch.
On the right the two samples are Basketweave, bottom, and Diagonal Gobelin, top. Baketweave was extremely difficult to do because the hair kept the canvas covered. Diagonal Gobelin was much easier to stitch. The fur will obscure any actual stitch you do, so longer stitches are better because they will cover the area more quickly.
The two samples on the top left are both stitched in Continental. I had been told that the thread could be trimmed. The top left sample is brushed but not trimmed. The middle sample is brushed then trimmed. Trimming does make details easier to see, but it is still pretty hairy. Repeated passes of trimming will give a more consistent look.
Tips for Success
- Always pull hairs that have been caught in the stitch to the front of the canvas. Do this by teasing them out with your finger or a needle.
- To make threading your needle easier, cut the thread where there is less hair and always use a needle threader.
- If it unravels, cut off the unraveled section before threading the needle.
- Stitch from the bottom of an area to the top. This will keep the hair out of later stitches.
- The details of your stitches will be hidden, use simple stitches such as Tent and Gobelin.
- Brushing with your finger brings out this stitch nicely.
- When trimming use sharp scissors. Trim once to slighty longer than the desired length. You will need to trim longer hairs that are left behind.
- When you think you are finished trimming, examine the area under bright light. You will likely find longer hairs that will need to be trimmed.
About Janet M Perry
Janet Perry is the Internet's leading authority on needlepoint. She designs, teaches and writes, getting raves from her fans for her innovative techniques, extensive knowledge and generous teaching style. A leading writer of stitch guides, she blogs here and lives on an island in the northeast corner of the SF Bay with her family

Leave a Reply