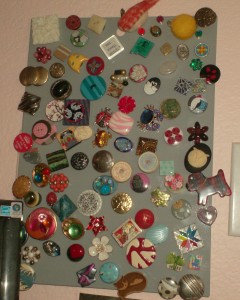
Recently I saw an article about making cabinet knobs from recycled items and things you find in the thrift shop. That idea applies just as easily to using many of these items to make magnetic needleminders.
Not only will they keep the edges of your canvas neat, they add a charming bit of beauty to your stitching life.
Have You Thought of Using These?
- sea shells These were the first minders I made. I really like the smooth “buttons” that close the shell’s openings. Make sure your shells are not delicate so they won’t break.
- watch faces Thin and usually metal, they are perfect in size and shape.
- bottle caps Use real ones, not the blank ones from craft stores. The great thing about these is that you can use thicker magnets and they still stay close to the canvas.
- political and other pin-on buttons Remove the pin and you have the start of another flat magnet.
- vintage pins Look for smaller ones. Because these usually are domed, use thicker magnets and test if they will still hold the back magnet before gluing.
- pebbles Look for ones that are small and relatively flat. Ceramic magnets may not attract through thicker stones.
- paper & postcards Finish with ModPodge over wooden rounds.
- fabric-covered buttons Pick your size and use up scraps.
- molded polymer clay You can buy small molds to make items from this clay. Or you can use small candy molds. Follow directions to make
- lapel pins Look for distinctive enamel ones.
Make sure that when you pick items for your tops, you pick ones with flat surfaces (at least in part). Needles fall off curved surfaces. If your top is highly dimensional, like the animals, use a magnet that’s slightly larger and glue decorative paper on it first to give your needle a place to sit.
The size of your top is up to you. Because most of my projects are small, I tend to use minders about the size of a quarter. Pick your recycled items based on your size preference but try to keep the smaller than 1.5″ in the narrowest dimension so they fit in unstitched margins.
Making a Magnet
To make your magnet you will need: super glue (I use E6000.), 2 ceramic or rare earth magnets per minder (do not use craft store magnets), decorative top
- Take apart your pair of magnets. Set one aside far enough away so it won’t “jump” onto the minder you are making (I’ve spoiled many this way.)
- Cut or sand off and bumps, shanks, or rough edges on the back of your top.
- Glue one magnet to a solid area on the back of your top. If your top is large you may want to use a larger magnet or more than one magnet. Let dry for several hours or overnight.
- Place the second magnet onto the exposed magnet on the back. Store or use.
More Great Magnet Ideas
- Golden Animal Magnets
- Making your own Magnets
- Old Map Magnets
- Mid-century Modern Magnets
- Hashtag Magnet
- Two Kinds of DIY Needleminders
- Dollhouse Books as Minders
About Janet M Perry
Janet Perry is the Internet's leading authority on needlepoint. She designs, teaches and writes, getting raves from her fans for her innovative techniques, extensive knowledge and generous teaching style. A leading writer of stitch guides, she blogs here and lives on an island in the northeast corner of the SF Bay with her family

You mentioned that you like needle minders about the size of a quarter. That reminded me of the one I have made with a quarter. It was a favor from an EGA Great Lakes regional seminar in Indianapolis and the quarter was a new Indiana coin. After that, I made a few from interesting coins I’ve brought home from my travels. When I use them I get to stitch AND revisit great memories.
What a fantastic idea! I’ve seen jewelry made from coins but not needle minders. I’ll have to try that.
Keep stitching,
Janet