Updated September 2, 2022.
Have you ever had this happen to you? The design is lovely, you’ve admired it for years, you pick threads, start stitching and it ends up looking just wrong.
Well, it happened to me recently. This design is one I just love. As I stitched it, I realized I had made some dreadful mistakes in my choices.
I had picked a stitch (Woven Stitch) and a thread (a metallic) which were not right for the background. The metallic was too close to one of the foreground colors and Woven Stitch is way too hard to compensate with a design that has so many tiny areas and is round. As I worked on it last night, the full impact of my misjudgment came crashing on my head.
So what as I going to do?
First, are you too far along or can the mistakes be ripped out? I once ripped out half of a background (it was a smallish piece) because the dyelots of the thread didn’t match.
If you are too far along to rip out, can some aspects of the piece be done after the problem areas to minimize them or to make them go more into the background? In the piece, there was lots of opportunity for backstitching and couching. I’m hoping by doing that OVER my Woven Stitch the mistakes and bad compensation won’t be as obvious. Ditto for the outside edge where I am going to couch a heavy thread to hide the uneven edges.

Could you put another layer of stitching over it? Perhaps stitching over in a much lighter thread, doing a blackwork pattern in Backstitch or adding couching would mask a problem with a background color choice that is a bit off. Adding just a single strand of floss or silk over a Tent Stitch background would change the color slightly. Sometimes it’s only a slight change that is needed, or even a more interesting texture. Adding a strand or so of a different color or texture can be enough to do this. It deepens the layers of texture and color, making them look less flat.
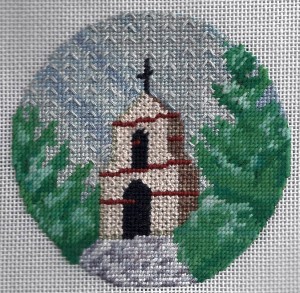
I added a Blackwork over the background on the mission pictured here to fix the problem with color changes in the background.
Is there another way you could use the piece? Think about adding or subtracting background to make it a self-finishing piece.
Do you have areas of foreground which are too close to the background color?
This causes “holes” in the design, where it looks as if part of the design is missing and the background is showing through the hole. The way to solve this problem is to add backstitching around the area so it will stand out. If there is backstitching and couching all over the design, use one of the colors I will be using for backstitching which isn’t at all close to the problematical colors.
But this is a bold method of doing backstitching. A more subtle approach would be to use a similar color of floss a shade or two
darker. This will hardly be noticed by the eye, but will make the problem area look more defined. If you are familiar with counted
cross stitch, this technique is used all the time, partly because the stitches seem to “melt” into the fabric. In needlepoint, this isn’t needed often because the stitches are more defined. But you can use this technique to add definition to needlepoint.
For a really bold outline, use Whipped Backstitch where a second thread is wound around the first.

Because needlepoint stitches have a definite slant, making curved lines can be a problem and many designs have lots of them, going in all directions. Couching a single line of thread makes these curves look more natural, narrower and solid. When couching, use a slightly thicker thread than you would use for stitching the line and couch with a matching color. I like to use three strands of floss as the thread to be couched and a fourth strand as the couching thread. Loop your thread over the thread to be couched gently, don’t make the thread pucker. Add a stitch wherever you think it needs support; these stitches should be closer together on curves.
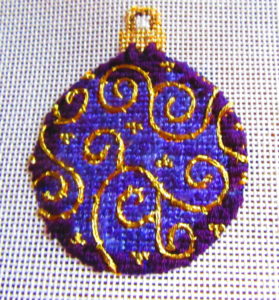
I couched all the lines in the ornament above because they are all curved.
There are many threads out there that won’t hold up to going through the canvas, but by couching you can use many of them.
Always make couching the last step in the process because it is more delicate; this way your stitches won’t mess up the couching. And because it will lay on top of the other stitching, you can direct it more easily.
About Janet M Perry
Janet Perry is the Internet's leading authority on needlepoint. She designs, teaches and writes, getting raves from her fans for her innovative techniques, extensive knowledge and generous teaching style. A leading writer of stitch guides, she blogs here and lives on an island in the northeast corner of the SF Bay with her family

Wow! What a concept! We can look at stitching disasters, learn from them and possibly make some corrections. Pieces do not have to sit for months or years in our IP (in progress) basket waiting for a little needle point fairy to make everything right or to “rip, rip, rip” all of the stitches we put in. It is also comforting to know that someone as experienced as you, Janet, also face similar problems. I’ll look at my IP projects in a new light and view them as challenges not dead ends… If Leonardo could paint over parts of his canvases to make corrections, I can do the same to my canvases with a needle and thread.