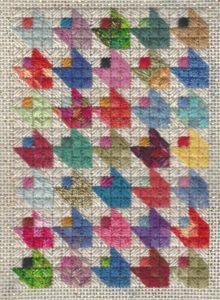
Creating wonderful quilts from your odds and ends of fabric is a great tradition. These quilts, called scrap bag quilts display a wide variety of colors. It’s a tradition we needlepointers should adopt. How often do we find ourselves a yard or two of thread taking up space in our stashes. With this monthly series we’ll put those scraps to work to create lovely small needlepoint projects.
Each of these projects uses those odds and ends. I collect mine in a small basket that gets emptied in the project bag for the series when it’s full. Most of the projects use a single thread for the background. In most cases you can use any thread and color you like. You can use any 18-mesh mono canvas you have. I used scraps of canvas from my stash.
Because this is the beginning of the series, I’ll give you the “rules” for Scrap Bag Needlepoint(tm). This will be followed by the material list and the stitching instructions.
Remember you’ll find these projects here at Nuts about Needlepoint the fourth Tuesday of the month.
Scrap Bag Needlepoint ™ Rules
There are two keys to making a great scrap project. The first is pre-selecting your threads. Often, as is the case here, the colors and threads are completely random, so your selection is easy; it’s everything! But what if you wanted your project to be a single color, a particular color scheme, or colors chosen from a single object? To do this you manage your threads by selecting only the ones that will fit your scheme before you begin to stitch. You pre-select and put only those threads in your project bag. The pre-selection process can exclude other things as well, such as multi-colored threads or metallics. By selecting the range of threads you might want before you start to stitch, you’ll get results that look great!
The other key to creating a great Scrap Bag Needlepoint(tm) project is to have a random distribution of threads. For needlepointers this is harder than it might seem. You can get results that look random by placing each thread you select carefully. You’ll know if you can place the thread in this or an adjacent block by following these rules:
- Have relatively few accent threads (fuzzies, furs, metallics).
- Do not put areas of the same thread next to each other.
- Do not put threads similar in texture or color next to each other.
- Once a thread is used and there is still have some left, put it aside.
- Sprinkle the overdyes all over the stitched area.
Material List
5″x7″ 18-mesh mono needlepoint canvas
35-70 threads in various colors
1 skein background thread (cream used here)
Stitching Instructions
The finished quilt has 35 tulips. Each tulip uses one thread for the tulip and one for the center. Depending on the number of scrap threads you have and their length, you can use a single thread in more than one flower. In the model a few flower threads are used twice but, in general, threads are used in 1 flower and 1 center.
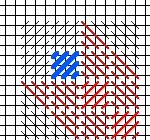
The project has 7 rows of 5 tulips. A single tulip block is charted below and will be repeated for all the tulips. It’s easiest to stitch all the tulips first and then to fill in the background.
Depending on your canvas color, you may skip the background. This will create a contrast between the patchy tulips and the solid background. I preferred the patchy look of the stitched background.
The block is stitched as charted below in a combination of Scotch and Half-scotch in regular and reverse orientation.

Once you have completed the quilt you may “bind” it with a row of Tent Stitch all around.
Come back next month for another great Scrap Bag Needlepoint ™ project!
About Janet M Perry
Janet Perry is the Internet's leading authority on needlepoint. She designs, teaches and writes, getting raves from her fans for her innovative techniques, extensive knowledge and generous teaching style. A leading writer of stitch guides, she blogs here and lives on an island in the northeast corner of the SF Bay with her family

[…] Scrap Bag Tulips Free Needlepoint Project – 1 freebie(s)? […]