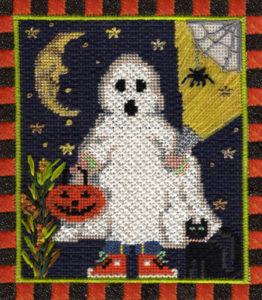
Look up in the corner of this trick or treater, see the spider web? It isn’t the dense spider web we think of when we think Spider Web Stitch. The Cobweb is stitched using Ridged Spider Stitch over a layer of fabric. This layer adds a gossamer level of color, while the Spider Stitch creates the structure of the Cobweb. There are two kinds of Spider Stitch, Ridged and Smooth. In Ridged Spider Stitch, the ribs stick out. In Smooth Spider Stitch, the ribs are covered. For the Cobweb, Ridged Spider Stitch variation will be used.
Begin by cutting two sections of tulle to match the canvas color slightly larger than the size of the Cobweb. Trace the Cobweb’s shape onto a piece of paper. Then trace this shape onto the pieces of tulle with Fray Chek. Allow this to dry and cut them out. Depending on the transparency of the fabric, you may want to use two layers (the trick or treater does). In the web’s location, baste the fabric onto the canvas. The basting will be cut out after the spider web is stitched.
Stitch over the tulle by making the ribs of the spider web first. These should be made with a single strand of a silk or cotton #8 pearl (I used grey Elegance here) and should follow the ribs painted on the canvas. There are three ribs here. Each begins in the corner of the web and moves out. The center one is a diagonal line and should be stitched first. Add a couching stitch or two to secure this rib. Put these stitches at the intersections, so they will be hidden. The other two ribs are irregular lines. Add couching stitches to make the rib conform to the painting on the canvas.
Use the gray Elegance for each of the rounds of the web. In Ridged Spider Stitch many rounds normally are stitched, creating a tightly packed ridged shape. In this variation, above, only partial rounds are stitched.
Begin to wrap at the right side. Go over the first stitch, come back underneath it and on to the next spoke. The needle should enter and exit the canvas invisibly under each spoke to anchor the threads. In the standard version of the stitch you do not enter the canvas except at the beginning and end of the stitch.
Each spoke of the web is wrapped the same way; bring your needle to the far side of the spoke under the Straight Stitch. Wrap around the spoke, bring in into and out of the canvas under the spoke, and end with your needle once again under the straight stitch at the far side.
Do this over each of the Straight Stitches. After you have wrapped the spoke at the top edge of the canvas, bring your needle back into the canvas and secure. The arrows show the direction the thread should travel; it goes under the Straight Stitch, back over it (making the ridge) and then back under to the next spoke. A way to remember this is “under 2 and over 1.” The Ridged Spider Stitch restarts at the right side of the canvas for the second round of stitching.
To finish the spider web and to secure the longer threads on the last round, you may want to couch down the Elegance occasionally along the edge of the web.
About Janet M Perry
Janet Perry is the Internet's leading authority on needlepoint. She designs, teaches and writes, getting raves from her fans for her innovative techniques, extensive knowledge and generous teaching style. A leading writer of stitch guides, she blogs here and lives on an island in the northeast corner of the SF Bay with her family

Leave a Reply