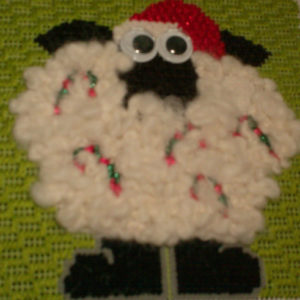
On Mondays & Thursdays for the next few weeks, I’m going to be sharing with you specific tips, threads, and stitches for stitching different types of fur. Because animals are often part of our stitched nativities I am going to focus on techniques for stitching the specific animals you might find in your nativity set. The articles will be illustrated with several of my own projects. Each of the techniques I’m writing about is one I have tested and used successfully.
The wide range of threads available these days makes it very easy to select a thread, or threads, that will let you make realistic animals easily. For stitchers. not only does it make this easy to accomplish, but it also means that your needlepoint can look textured and exciting even if you only know a few stitches. Most of the techniques you see take advantage of this.
Fluffy Fleece Sheep
At the top of this article, you find a delightful sheep from Annie Lane. Sheep can be a real puzzler to stitch. It’s hard to find a good balance between the curly fleece and a “poodle perm.” Using a single stitch can also make a sheep look very flat.
Threads that are loosely twisted and have variations in width can look like fleece but they have serious difficulties for the stitcher. Loosely twisted threads cannot survive going through needlepoint canvas (they shred). Uneven threads cannot be pulled through the canvas because they are too thivck in several places.
Happily, there are some threads that are exactly what’s needed here. The first thread I knew of that was like this was Woolies from The Thread Gatherer (no longer made). Rainbow Gallery came out a few years ago with two sizes of Fluffy Fleece, regular and petite. The petite size is no longer made.

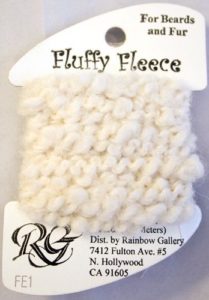
As you can see from this picture of the thread card above, Fluffy Fleece has a loose thick and thin wool, called roving, turned into a more stable thread by a thin base thread that twists around it. When you stitch with it, the base thread entirely disappears.
You cannot pull this thread through the canvas. That means you will need to couch it! To do this have a needle, the fleece, and white crewel wool. Although you could use a strand of floss to couch, I like wool because it blends so nicely into the fleece.
Cut a short length of fleece (about 12″ or so). Lay it down at one edge of the area to be stitched. Bring your threaded needle with the crewel wool out of the canvas at the end of the fleece. Go over the fleece to couch it down.
Continue to lay down the fleece and couch it at intervals. Where the line of fleece curves, couch more often. When you get to the end of your length of fleece couch at the end so it won’t stick out.
To begin your next length of fleece, have it overlap the previous length just a bit and couch just as you did the first length.
That’s the process but there are no rules. You don’t have to couch in any particular direction or in any type of line. The thread itself is random enough in width to make this unnecessary. You don’t have to be fussy about couching, you can even occasionally pierce the thread.
It’s easier to see to start couching if you always cut your thread at a narrower section, but this isn’t critical. It also helps if from time to time you step away from your work and look at it to see where it’s thin. In those places, you can couch down some more fleece.
On Thursday, we’ll look at using French Knots to make sheep’s fleece and on Monday we’ll make a shaggy donkey.
About Janet M Perry
Janet Perry is the Internet's leading authority on needlepoint. She designs, teaches and writes, getting raves from her fans for her innovative techniques, extensive knowledge and generous teaching style. A leading writer of stitch guides, she blogs here and lives on an island in the northeast corner of the SF Bay with her family

Leave a Reply