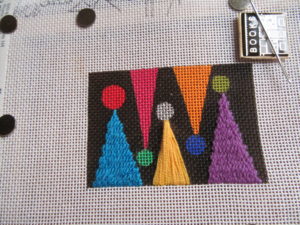
Triangles, especially when small, can pose a difficulty for finding stitches. Today we will look at two ways to stitch them. They are shown on the blue and violet triangles and on the yellow triangle. Next Thursday we’ll look at the final triangles and at the first way to stitch circles. All three stitches used for triangles here will be forms of Gobelin Stitch. As you can see they give you very different looks.
Encroached Gobelin
This stitch is used for the blue and violet triangles. It can be different lengths and slants. It can also be oriented vertically, as is the case here, or horizontally. In addition, the slant can also be reversed. The diagram below shows the stitch used.
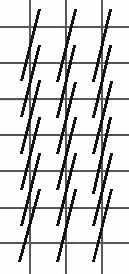
The stitch is encroached because each row begins or ends inside the adjoining rows, giving a textured but not defined look to the rows. That means that often you do not need to compensate rows to fit areas because the future rows will fit the space. Sometimes you do need to compensate, especially with longer versions of the stitch.
It is also a stitch that often self-shades. This happens because the stitches in one row peek out between the stitches of adjacent rows. This creates the opportunity for optical blending, a key to sharding in needlepoint.
TIP: When making this stitch always be sure that only a single stitch is between any two stitches in an adjacent line. Doing this keeps the stitches from bunching up and keeps the rows smooth.
Flower Gobelin
The yellow triangle is stitched in Flower Gobelin. This is more a method than a stitch; it allows you to stitch smooth flower petals. Most of the stitches in this technique go in a single stitch from one end of the area to the other. This makes it a better choice for smaller areas.
Because most of the stitches will be sharing a hole, enlarge the hole at the top of the triangle before starting to stitch.
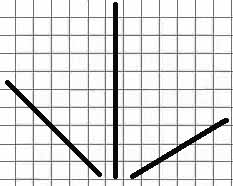
Begin by making three stitches the length of the triangle, one on each side and one in the middle, below.
Divide the two sections you made in half by adding new stitches, below.
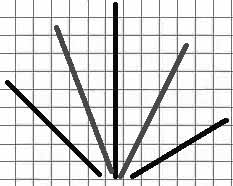
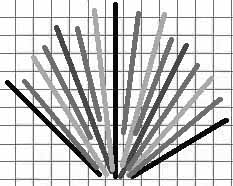
Continue to add stitches, splitting each new section into two parts until the area is filled.
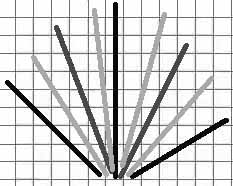
Finish up by making shorter stitches to fill in the area and to make the stitches conform to the shape you want.
About Janet M Perry
Janet Perry is the Internet's leading authority on needlepoint. She designs, teaches and writes, getting raves from her fans for her innovative techniques, extensive knowledge and generous teaching style. A leading writer of stitch guides, she blogs here and lives on an island in the northeast corner of the SF Bay with her family

This is great. Thank you so much. I was just looking at a new aspen fir pillow on crate and barrel. Of course I was thinking … I could do that so much cuter in needlepoint …. what stitches would I use? This pillow has three tress which are basically triangles. Encroached Goblin would be perfect. Technically I won’t be stitching my stash, since I am picking up needlepoint after a 20 break, but I bet I can find great inexpensive threads that will give me the pine look I am after. I look forward to your post about circles. Those trees could use some ornaments.