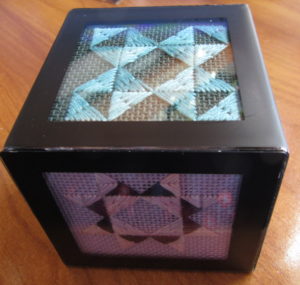
Do you have a bunch of small (2.5″) needlepoint pieces around? I found an easy and very clever way to finish them. Recently I was at my local Michael’s looking at their mini frames. Nestled there was a plastic mini photo cube. The mini frames are inexpensive (3 for $10) so I got one to try.
In the past I have not been happy with items made only for photos as a way to finish needlepoint. Usually their openings aren’t thick enough to hold stitched needlepoint. If you want a “needlepoint” cover you need to make a color copy and put that in.
I was delightfully surprised by the Studio Decor cube. This cube has two three-sided halves that slide into each other. The sides have small lips that help keep the sides fitting nicely. Inside the cube is a cardboard cube. It’s important to keep this. Each face of the cube has a 3/8″ black border on it. That makes the face of each side exactly 2″. Your needlepoint needs to fit that space.
I had, as you can see in the picture above, several charming quilt blocks stitched on colored canvas. These would be perfec for the cube if they would fit.
I used the cube as my pattern to cut one of my pieces. Then I placed the needlepoint on one of the sides. Because there is nothing in the middle pf the cube to hold items in place, my needlepoint would not stay in place on its own. After I replaced the cardboard cube, I found I could assemble the photo cube with no problem. The needlepoint stayed in place and the cube snapped together easily.
Because I knew I could use needlepoint on one face my next step was to place needlepoint on all three faces of that half. The fit was slightly tighter but still no problem and the cardboard cube fit perfectly. I was able to finish the cube with no difficulties.
It makes a pretty way to show off a set of small designs. I plan to get more.
Tips for Photo Cube
Although I used the cardboard box as my pattern, a far better choice would be to use a piece of clear acrylic as your pattern. Several of my pieces are off center. The acrylc would be a more accurate pattern.
The cardboard box has writing on two of the sides, opposite each other. If you are using needlepoint with open backgrounds as I did, you need to be careful about what the printed sides back. I chose for these sides the patch on dark green canvas and a patch where the design was larger. These minimized the show-through of the printing. If you cannot do this, paint over the lettering, or cover the printing with a very thin piece of paper.
Putting the second half on is harder because the needlepoint is working against gravity here. I found it easiest to place the needlepoint on the open sides before I placed the second half of the cube. Then once I placed it I adjusted the sides and top to fit correctly before I gently slid the second half into place.
The photo cube is very light. If you want it to be heavier or use it as apaper weight, open the cardboard cube and place pennies or pie weights inside. You should secure the top of the cube with tape before finishing.
The presence of the cardboard means this item is not acid-free. Therefore these photo cubes are not designed for heirloom projects. They are a quick and fun casual project.
About Janet M Perry
Janet Perry is the Internet's leading authority on needlepoint. She designs, teaches and writes, getting raves from her fans for her innovative techniques, extensive knowledge and generous teaching style. A leading writer of stitch guides, she blogs here and lives on an island in the northeast corner of the SF Bay with her family

I really enjoy your posts & I have learned a great deal. Your latest finishing idea w/the photo cube is unique; a wonderful way to display besides framing. I could practice different stitched & rotate the pieces. Ty for sharing your expertise.
Was thinking along the same lines. Even just turning up a different face gives you a new look. I’m thinking that my next one will have some of the Mindy minis I did on the blog as free stitch guides awhile ago.
Keep stitching,
Janet