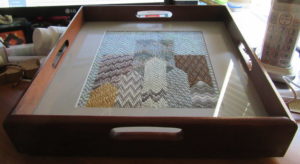
Sudberry makes wooden trays in different sizes, both square and rectangular. I recently used one to finish the Bargello sampler pictured above. If you are looking for a lovely gift, use one of these to finish some of your already-stitched needlepoint.
Please pardon the poor picture, my cmera was running out of juice, so I couldn’t get a better picture.
Your tray comes already assembled. Under the glass, there will be a piece of paper that has the item and the measurements and sometimes a wooden mat. The mat is removable. The size of the tray is also on the detail page for the item. On this page, two measurements are shown. The larger one is the outside measurement of the tray. The design size is the inside measurement of the tray.
The design size measurement is critical. this is the maximum size of any needlework for the tray. The tray may come with a matching wooden mat. On my square tray, this mat was 1″ wide.
If you are using a tray to finish your needlepoint, begin by finding a stitched canvas you would like to use. I test fit this by putting it on top of the tray. My needlepoint is about 8″ square. Suppose it looks as if the wooden mat is the correct size. If it is, use that as the mat. If your needlepoint is the same size as the design area, you will not need a mat. If your needlepoint is too small for the wooden mat, you will need to have a mat cut (I did).
After you have gathered your materials together, you will need framing tape and acid-free cardboard if your needlepoint is matted. Make sure your needlepoint is square.
Begin by disassembling the tray. Newer trays have screws in the back, one in each corner. Older trays have screws in one of the sides. Set aside the screws and the removed panel.
If you are using a mat, assemble the needlework sandwich. Center the needlepoint on the acid-free cardboard and put a bit of tape on one side to hold it temporarily. Place the mat on it. Adjust the needlepoint if needed to have it inside the mat properly. Remove the mat and tape the other three sides of the needlework. Remove the temporary tape and tape down this side. Secure the mat with two tape hinges. These are pieces of tape, both on the same edge, half on the mat and half on the cardboard. This allows you to open the mat like a book.
From here, follow the instructions for the type of tray you have. When finished, put on the part set aside and screw it on, doing these partway all around and then tightening one by one.
If you plan on putting wet things on your tray, you can make it watertight by running a bead of clear silicone caulk around the edge of the glass.
Make sure the needlepoint is nicely centered before closing.
Side-opening Tray
Slide either the mat sandwich or the needlepoint between the glass and the back. If you have unmatted needlepoint you may find this hard to do because the stitching is too soft. If this is the case, use a small piece of artist’s tape to secure the needlepoint temporarily to cardboard. The cardboard should be slightly longer than the tray.
If you are using needlepoint without a mat, once it is inserted, remove the tape and pull out the cardboard (that’s why it’s longer).
ack-opening Tray
Put either the needlepoint or the mat sandwich inside the tray. You may want to put a piece of very thin interfacing behind the needlepoint to pad it a bit.
Sandwiches do not need padding.
Make sure the needlepoint is nicely centered before closing.
About Janet M Perry
Janet Perry is the Internet's leading authority on needlepoint. She designs, teaches and writes, getting raves from her fans for her innovative techniques, extensive knowledge and generous teaching style. A leading writer of stitch guides, she blogs here and lives on an island in the northeast corner of the SF Bay with her family

Hello Janet,
My grandmother is a needlepoint nut but her macular degeneration makes it too challenging even with the help of a magnifier. Do you know of any extra large needlepoint kits? I have seen childrens kits at craft stores but would like to find her something more sophisticated. Any suggestions much appreciated.
Thank you,
Dyan
Stitching Littles, a new line fron Purple Palm has a growing line of great kits on 7 mesh. While some of the designs are very kid-friendly, many of the designs are good for adults. They come with nice threads and would be a great choice.
Other designers, including Little Bird (https://littlebirddesignsart.com/collections/hand-painted-needlepoint-canvases/12-mesh) make canvases and kits on 12-mesh.
Keep stitching,
Janet