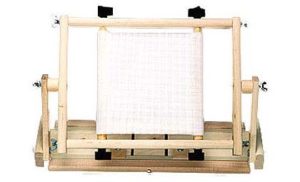
Belt Frames are specialized scroll frames that have a stiff outer frame around the scroll bars, designed to help keep long narrow pieces, such as belts, taut. K’s Creations makes them as well as making regular belt frames.
Not all shops know about them, but they are wonderfully useful frames. They come in several different widths (6″, 9″, 12″, 16″ 18″ 28″). The 6″ or 9″f frames are perfect for belts. The other sizes work well for larger canvases.
You will want to buy your frames to be at least 2″ wider than your canvas because you want air space on either side.
Many of us find stitching on larger pieces awkward because long stretcher bars can be hard to handle. If you have this problem, consider using these bars. Currently I have a Christmas stocking and a long skinny piece on belt frames.
Tips for using Belt Frames
The traditional way to attach a canvas to scroll rods is to baste the canvas on to the tape stapled to the scroll rods. It’s important to do this straight so that the canvas stays straight, That means you baste in the same row of holes in the canvas and along a straight line on the tape. I find holding the canvas in place to this cumbersome, you might try pinning to free a hand for this step.
An alternative is to use Velcro or other hook and loop tape. To do this cut a piece the length of the stretcher bars. Attach the hook side to the wooden bar (not the tape). Press down firmly. Put the loop side onto the back of your canvass and press down. Put the two sides together and press along the length. Repeat these steps when you do the other end.
Since canvases that use these frames tend to be long, attaching the second side can be unwieldy. You can make it easier by loosening the knobs for the first bar and rolling up the canvas on that bar until just enough canvas is showing to meet the second bar. Finger tighten the first knobs and attach the second side to the second scroll bar.
Once the canvas is attached at both ends, loosen the knobs and adjust the location of the canvas so the area you want to stitch shows.
These frames do not show much of the canvas at one time, so you might find it easier to work on canvases where you work from one end of the design to the other.
Instead of the scroll bars being on the top and bottom, they are placed on the sides. While perfect for belts, when stitching other items, you may find it more difficult to place stitches.
The best way to deal with this problem is to turn the frame a quarter turn so the scroll bars are top and bottom to place the first stitches. Then it is less difficult to continue stitching the area with the bars at the sides. If you don’t have trouble turning your stitches you may not need to do this, I don’t.
Scroll bars are notorious for loosening while you work. Be prepared to tighten the knobs often. There are devices to minimize this problem and I will be testing them soon and will report on this.
About Janet M Perry
Janet Perry is the Internet's leading authority on needlepoint. She designs, teaches and writes, getting raves from her fans for her innovative techniques, extensive knowledge and generous teaching style. A leading writer of stitch guides, she blogs here and lives on an island in the northeast corner of the SF Bay with her family

Leave a Reply