When overdyed threads first came out, we were told they could take the place of several solid threads because of the different colors in each thread. We found, when we stitched in our usual way, that the reality was different: diagonal stripes or dotted lines of color, abrupt color changes, and needlepoint that didn’t look very good. Quickly we abandoned the idea of using these threads in canvases that looked like something and restricted them to limited places or to use in geometric and abstract canvases or for backgrounds.
This happened to me as well. It bothered me though, I kept thinking there must be a way I could use these threads I loved in the canvases I was stitching. I found I did better with textured stitches and Continental but I kept thinking that I hadn’t released the potential of these threads.
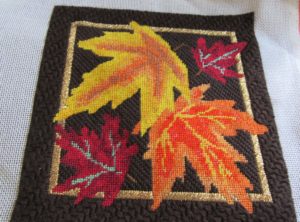
This technique of shading with overdyes allows you to unlock that potential, creating lovely needlepoint in Tent Stitch that’s easier to do than you might think. I used this technique on all four leaves on this vintage Tink Boord-Dill canvas. The leaves are stitched entirely in Tent using Needle Necessities (now Threadworx) and DMC floss, The veins were stitched with DMC only, but the leaves were stitched in blended threads with two strands overdye and two strands solid.
This technique only works if you can find overdyed floss in a color combination that matches the canvas. Lets say I had a leaf that was a combination of orange, yellow, and red. If I could not find an overdye with those colors, I could not use this technique. Another possibility, seen on the yellow leaf above, is to use more than one overdye. That leaf used two an orange/brown and a yellow.
Once you have found your overdye, pick solid threads to match.
Make a 50/50 blended thread with the overdye and one of the solids. Stitch the areas on your canvas that match the solid thread. Put the stitches you make when the colors in the two threads do not match at the borders of these areas where thy meet areas where the canvass color matches the new color on the overdye.
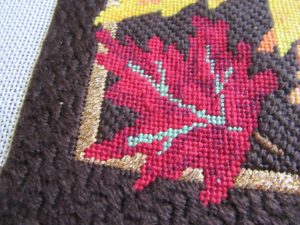
Stitch all the areas with this blend. Next switch to a 50/50 blend with the next solid. Stitch these areas in exactly the same way. You will get a result similar to the leaf below.

The effect created unifies the design more than simple single-color needlepoint does and creates some subtle shading. The twining of solid floss with the different colors in the overdye unifies the colors in areas where it is used. Because the mismatched parts of the blended threads are put on edges, they create a transition thay serves the same purpose as shading.
When you are using this technique you will be jumping around. I use Continental when I do to minimize the possibilty of ridges in my work.
About Janet M Perry
Janet Perry is the Internet's leading authority on needlepoint. She designs, teaches and writes, getting raves from her fans for her innovative techniques, extensive knowledge and generous teaching style. A leading writer of stitch guides, she blogs here and lives on an island in the northeast corner of the SF Bay with her family

Love this idea. Thanks. Enjoy your blog.
What are the other stitches for the background and frame? Thank you
The frame is Diagonal Gobelin. The outer border is Byzantine. The main background is Diagonal Scotch.
Keep stitching,
Janet