A lovey aspect of needlepoint is that there are so many stitches. While we can be happy for many years just knowing a few stitches, which we may have learned without diagrams, sooner or later we will encounter stitch diagrams. Once we understand how to read and use them, a whole new world of stitches opens up. That’s because we can now use this language of diagrams to increase our knowledge.
A stitch diagram is not a chart. It is a version on paper or screen of the stitch as it is actually made on the canvas. Compare it to the chart below. In the chart one square equals one stitch. It could be anything: a needlepoint stitch of any size, a cross stitch, a bead, a filet crochet stitch, or a knitting stitch. The chart itself gives you no information about this. That’s the strength of a chart.
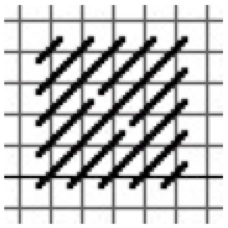
A diagram, such as the one below, is specific to needlepoint. It uses the grid lines as substitutes for the threads on your canvas. It shows you through lines, not symbols, the direction as well as the starting and ending points for each part of the stitch. It shows you how rows are organized, what stitch units look like, and how units and rows interact. The diagram can also show you the way to make a stitch using numbers, how stitches cross, or how many threads or colors to use.
The stitch shown below, Akita Scotch, we can see is made up of eleven stitches, making a 5×5 square. We can also see from the diagram that the stitches get bigger for three stitches. This is followed by a line that has two shorter stitches, then a longer stitch. This completed half the square, Making the other half of the square is the two stitch line and then the three stitches getting smaller and smaller.
A stitch diagram will only ever show a portion of the stitch, anything from a single unit, as is the case above, to several rows. You don’t want an entire area to be charted, unless it is small. You want to be able to adapt the stitch diagram to your specific canvas. This is done by tiling. Think of the diagram as a tile. to cover a larger area, you add new tiles on each side of the tile you have.
— To make the stitch to the right of the existing stitch, the right side of the existing stitch becomes the left side of the tile.
— To make the stitch to the left of the existing stitch, the left side of the existing stitch becomes the right side of the tile.
— To make the stitch above the existing stitch, the top of the existing stitch becomes the bottom of the tile.
— To make the stitch below of the existing stitch, the bottom of the existing stitch becomes the top of the tile.
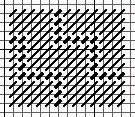
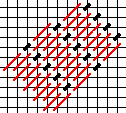
Just continue this process until you either know how the stitch works or you have filled the area. When it’s a stitch that has clear rows, such as Jacquard, below, the different rows alternate.
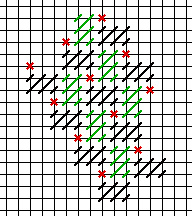
The process of “seeing” the next bit of stitching can be hard when the diagram doesn’t have straight sides, as is the case with Darling Stitch, below. The two process of alternation and tiling remain and will help you.
Applying a New Stitch
Although I love new stitches I sometimes have a hard time doing them right. I have the most success if I follow the process below:
- Keep the diagram close by until you know the stitch.
- Look at the stitch diagram and stitch it in your mind, looking for a pattern or familiar stitch that helps it make sense to you.
- Start with the row that is easiest to identify and make it (for me this is never a Tent Stitch row).
- Make additional rows until you return to the first row.
- Use tiling and alternation to continue to fill the area.
- Check your stitching with your diagram often.
Last week I learned a couple of new stitches. One of them, Temescal, is pictured below. It took me awhile but I realized there were two rows, one of vertical Cashmere Stitches and one of horizontal Cashmere Stitches and small Cross Stitches. I could see then how the second row fit into the steps made by the first row. I could also see how the Cross Stitches were always located in the same place with reference to the Cashmeres in the same row. Now I could stitch. I made a row of vertical Cashmeres. Once complete I could fit in the Cashmere and Cross row. That row left me spaces where I could alternate and place the vertical Cashmeres. This way I learned the pattern of the stitch quickly.

About Janet M Perry
Janet Perry is the Internet's leading authority on needlepoint. She designs, teaches and writes, getting raves from her fans for her innovative techniques, extensive knowledge and generous teaching style. A leading writer of stitch guides, she blogs here and lives on an island in the northeast corner of the SF Bay with her family
Leave a Reply