A couple of weeks ago I got a comment asking about the canvas in a kit. The colors were too close to be distinguished and the stitcher, a beginner, was frustrated.
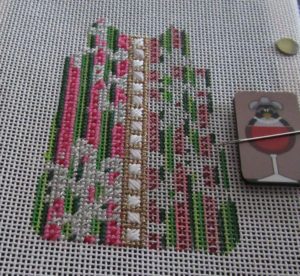
This got me thinking about what should be present in a first needlepoint canvas. The Barbara Bergsten canvas pictured above is a great example. Go through the checklist to see how many of the items on the checklist are there.
Signs of Easy-to-stitch Canvases
1. Is the artwork clear? Many printed canvases (often in kits) are fuzzy a result, I think, of the inks used. If the colors aren’t clear, it’s not good for beginners.
2. Is it easy to distinguish one color from another? Many artists will “push” colors so the colors on the canvas can be easily distinguished, even though the colors of the threads are close. If there is a color key, use that to check. If there is not, look at the canvas itself.
3. Are there holes blocked with paint or flaws in the canvas? This is a sign of lower quality.
4. Are lines straight? Can you tell what color each intersection should be? Kits and computer-printed canvases are less accurate to one degree or another, than hand-painted canvases. The more exact the painting (called stitch painting) the easier it will be to stitch.
5. Look for canvases with solid areas of color and no lots of fine details. These are harder to stitch. If there are shaded areas, the canvas is more difficult to stitch.
6. Areas of color should be medium to large without lots of internal details. Small areas an details mean you have fewer stitch choices.
There is a trade-off (isn’t there always?). A stitch painted hand painted canvas needlepoint will be more expensive.
Good needlepoint canvases exist at every price level and it’s worth it to be a smart needlpoint consumer.
About Janet M Perry
Janet Perry is the Internet's leading authority on needlepoint. She designs, teaches and writes, getting raves from her fans for her innovative techniques, extensive knowledge and generous teaching style. A leading writer of stitch guides, she blogs here and lives on an island in the northeast corner of the SF Bay with her family

All good points Janet. Your observations brought me back to the 70’s when all I knew were kits, and the number one thing that discouraged me from finishing a canvas was not being able to determine exactly where one color ended and the other began. Even to this day I do better when this is clearly defined although I stop and look at what I’ve stitched and if that looks right then I don’t worry about the painted lines. Although it’s in my nature to be a literal rule follower, I have trained myself to lighten up when it comes to stitching. The one thing that remains a major mystery for me now is whether to stitch the black lines defining elements of the design in black or in the adjacent color????
Hard to finish canvases are a problem. Last year I purchased a canvas which was hand drawn. I saw it at the California ANG show, and I fell inlove with it. After a few months I decided to order it. The characters were drawn in black ink, the threads and stitch guide came with the canvas, and it was a costly adventure. I consider myself an intermediate needlepointer, but this had to be definitely designed for an advanced needlepointer. Since there isn’t a needlepoint shop anywhere near our community, I have really struggled with this. I put it away for months at a time; then come back to it and try to pick it up. The stitch guide itself is hard to follow. I feel so guilty that I spent so much money on it and there it sits. Well, live and learn as the old saying goes. I know I won’t give up and I will continue to go back to it and keep trying. I enjoy your articles so much. Thank you for all your hard work.
Stitching the outline is optional. See if it adds to or detracts from the design I’ve seen some graphic designs that had a silhouette stitched to accent the design and set it off from a solid background.