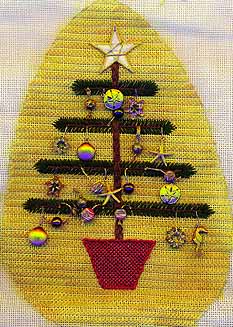
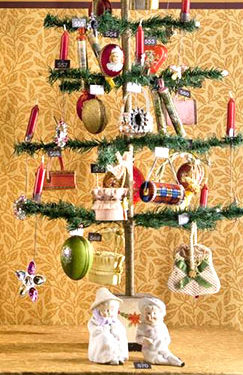
My free German Feather Tree pattern is a great project but it is small. While it’s easy to find similar trees made of wood for hanging ornaments, below, what do you do if you want a larger stitched design.
Begin by considering your measurements. You’ll want to have in mind:
- total height of the design
- total width of the design divided by 2 (length of longest branch)
- height of container
- width of trunk
Because the trunks are narrow, mine was 3 threads wide, the trunk measurement is only necessary if you need your tree to fit an exact space. Once you know these measurements and your canvas mesh, you can start working out distances and thread counts.
- Multiply all your height numbers by the mesh size. This tells you how many threads high thing are.
- Subtract the pot threads from the overall height number. This gives you the total number of threads in height (tree height).
- Calculate the total height of the branches. Each branch is four threads high. Most trees should have four sets of branches.Multiply branch width by number of branches.
- Subtract the total width of the branches from the total height. Write down this number. It gives you the amount of space to be distributed.
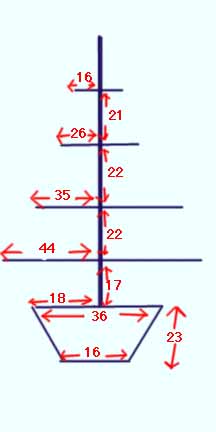
The trunk is divided into five parts: pot to bottom branch, three areas between branches, and top branch to tip. The areas between the branches should be even. The top and bottom areas can be this same size or slightly smaller.
You can see how I divided my area in the diagram below.
Finally, if you are making a large tree you might want your feathers to be longer or you may want more branches. These trees traditionally have wide areas between the branches, do not add too many branches. If you make the feathers wider be cautious. Traditionally these trees are made from short feathers to show off the ornaments. Adding one stitch to each side of the branch should be enough.
Now comes the tricky part, you know the number of branches, You know the total width of the longest branch. Multiply that number by the mesh size to get the total length of the longest branch in threads.
Deciding on the length is partly a matter of taste, but you want the branches to get progressively smaller. If you look at the diagram above you’ll see that my branches got smaller by 8-10 threads. One way to think about this is to divide your number first by the total number of branches (44×4, or 11, here). The other critical branch is the top branch. It should be the 1/4 number plus a 1/8 number (here 16 or 11 + 5). You do not want this branch to look too stubby. The difference can be divided between the remaining branches.
The middle branch lengths are starting points. Don’t put actual marks on your canvas for these lengths, use marking pins. You may decide you want these branches longer, mine were, or shorter. By having a clean canvas you preserve your ability to do this.
Yes, the method for measuring is not exact, but you can make your own larger or smaller feather tree.

About Janet M Perry
Janet Perry is the Internet's leading authority on needlepoint. She designs, teaches and writes, getting raves from her fans for her innovative techniques, extensive knowledge and generous teaching style. A leading writer of stitch guides, she blogs here and lives on an island in the northeast corner of the SF Bay with her family
Leave a Reply