Today we have a guest post from the wonderful folks at Rittenhouse Needlepoint. It’s from their monthly newsletter. In addition to having fantastic customer service and doing great charitable work, they are getting ready to unveil their new website in the next few days.
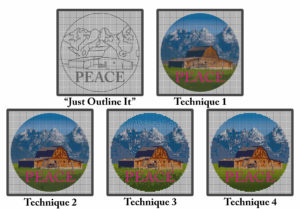
I’m very thankful to them for permission to reprint the article and additional comments. If you want to the example canvases in more detail, just click on the picture at the top of the page to open it.
Rittenhouse has a custom painting department that does lovely work (I’ve written stitch guides for some of their canvases). All too often we find ourselves wondering about what the different kinds of painted canvases are and how they differ. I have added my additions in [brackets.]
This month in the Painting Department we want to talk about the various stitch painting techniques available to you. Our painting techniques are tailored to your experience/preference as a stitcher and/or your comfort level as regards budget. We understand that the differences between these techniques can be a bit confusing so we thought we’d take this opportunity to give an in-depth explanation of the techniques. We are also unveiling a new technique that will allow for even more control over your custom painting pricing!
“Just Outline It”
Our newest technique, it is simply a detailed pencil outline of the scene that you would like to stitch. Each mark will fall on a stitch and areas of color change will be outlined. This technique is perfect for names, graphics and the experienced, creative stitcher who just wants a guideline to go off of and doesn’t mind making color decisions. This is the least expensive option so if you’re looking for something custom that doesn’t break the bank, this is it!
[This option is sometimes called line-drawn canvas or coloring book needlepoint. Russell, one of the owners at Rittenhouse told me that ‘The new technique “Outline It” has been more then popular. We are trying to do it in a bigger way for our wholesale clients but there is resistance from the traditional needlepointers. The young artists and creatives have embraced in full throttle as it allows them something inexpensive and then they are able to apply many fibers – not just needlepoint thread.’
Technique 1
Another choice for those who are looking for an option that is easy on the wallet, Technique 1 is a great way to break into custom painting. In this technique paint is simply brushed on the canvas with no regard to the underlying canvas grid. Technique 1 features a lot of blending of colors and is great for experienced stitchers and those who like to get creative with specialty stitches. Give Technique 1 a try, you’ll be surprised at what freedom it gives you in relation to stitch and thread choices!
Technique 2
The great in-between, Technique 2 is a wonderful compromise between Techniques 1 and 3. In this technique, “key areas” are stitch painted (things such as text, outlines and facial details). For those who don’t know, “stitch painting” is when each individual canvas intersection is painted a specific color so that the stitcher knows exactly where each color is intended to go. There is no guessing about whether a particular intersection is one color or another. Technique 2 is good for those who’d like to try specialty stitches and appreciate some freedom, but who also like to have the important areas clearly articulated for them.
Technique 3
By far our most popular option, Technique 3 is the best choice for beginners and traditional stitchers (‘basketweavers”) as well as those who look at stitching as a more meditative craft. The entire piece is stitch painted. There is no guesswork as to where to “land” each color. This technique is for those who like clear, simple and strong guidance.
Technique 4
Technique 4 is for advanced stitchers who like to also use thread blending techniques. It is completely stitch painted and it takes blended colors to their peak! The end results are very beautiful and great for those who like to experiment with their thread. The customer can dictate where they’d like the extra blending for perfect gradients.
About Janet M Perry
Janet Perry is the Internet's leading authority on needlepoint. She designs, teaches and writes, getting raves from her fans for her innovative techniques, extensive knowledge and generous teaching style. A leading writer of stitch guides, she blogs here and lives on an island in the northeast corner of the SF Bay with her family

Leave a Reply