Updated June 1, 2023.
I have had my tool bag with this canvas sitting on my desk for several days. I really love how I, probably unconsciously, picked medium and medium-dark colors for this piece and lots of fully saturated colors. It shows something really important about scrap bag needlepoint – Edit your colors before you start to stitch.
Editing your colors means thinking about. the final look you want and picking threads that go with that color scheme to go into your bag for that project. You don’t necessarily have to be slavish about this; you should add some colors that are different from your main combination to give your piece some life and sparkle. Here I used a couple of light colors that are scattered throughout the piece.
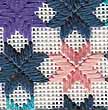
Not every scrap bag piece needs to have this editing. Here are two examples. The top one, Preppy Heart, is from my new book Quilty Needlepoint (Amazon link). It uses a color scheme of lime and pink with white. Here a few squares are made from two white threads to add some variety. The bottom picture is Stars of Sorrow from my book Scrap Bag Needlepoint did not have edited colors. Here the muted blue stars throughout tie the piece together.
Many folks who grew up during the Depression and World War II, especially in Europe, developed a “Make Do and Mend” mentality. This meant that stuff that was usable or that could be repaired was used or repaired. You didn’t throw things out if you could use them again. From that attitude came many lovely things. Today, for all we talk about “reusing” and “repurposing.” We can’t hold a candle to those ladies.
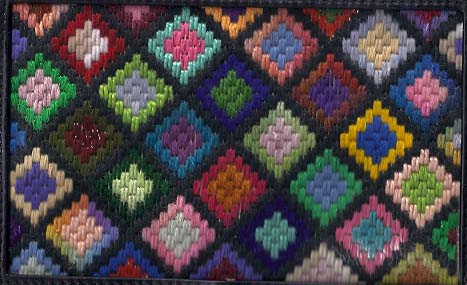
One thing you would often find being made by these thrifty souls was afghans. They gathered all their yarn scraps and combined them with a background color to make the blanket. This project, Nan’s Afghan, is based on these. It creates a Bargello framework of diamonds that are filled with two colors of your thread scraps.
Although the dark outlines create a framework, it’s the bright colors that really shine here. Using solid and semi-solid threads works best for this project.
Material List
To make this project, you will need:
- 18 mesh interlock or mono white needlepoint canvas 8 x 10
- stretcher bars
- permanent marker made for marking fabric
- silk/wool blend, silk, or wool in a dark color (model uses Silk & Ivory in Caviar)
- assorted scraps of thread (2+ yards per color)
Note on threads: Two yards should be enough to do one outer and one inner round on two units. However, because this is Bargello, you may need to thicken your thread to get good coverage. On many of my blocks, I doubled the threads and used about one yard for an inner round. I did not use any all-metallic threads, but there is no need for you to avoid them.
Step-by-step Instructions
This project was designed to fit into a self-finishing bag with an opening about 6×8. You can use any bag of this type you like. To create the outline for stitching, measure the size of the opening. Mark a rectangle in the center of the canvas with your pen, matching the opening in the bag.
Mount your canvas onto stretcher bars.
Starting approximately in the middle of the marked area, stitch the outline, below, using your dark thread. Make the outline (solid lines) to fill in the entire marked area, following the chart. Doing this first will make it much easier to fill in units.
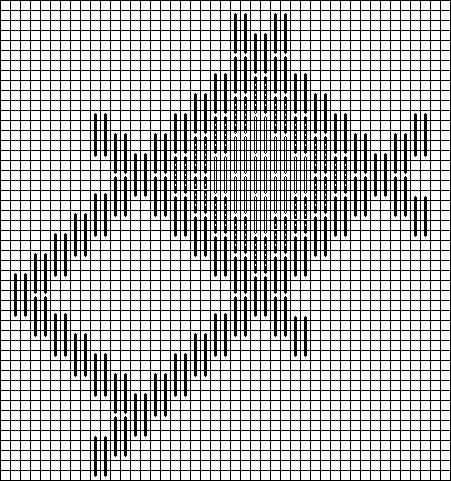
Picking a thread from your scraps, stitch the inner round (open lines) of one unit. Using the same thread if possible, stitch the outer round (striped lines) of a second unit.
Continue in this way, picking threads and stitching inner and outer rounds. Never have the same two threads in two different blocks. This becomes harder to do as the units fill up, but try. If you must have two units using the same threads, do not use the same thread in the same place in both. That begins to look too much like a pattern.
I love this kind of “fill in the blanks” design. I have one, Dots, in Bargello Revisited and another Stained Glass, in my Scrap Bag Needlepoint Book.
The links to the books, except for Quilty Needlepoint, go to pages in my Etsy shop for them.

About Janet M Perry
Janet Perry is the Internet's leading authority on needlepoint. She designs, teaches and writes, getting raves from her fans for her innovative techniques, extensive knowledge and generous teaching style. A leading writer of stitch guides, she blogs here and lives on an island in the northeast corner of the SF Bay with her family
Leave a Reply