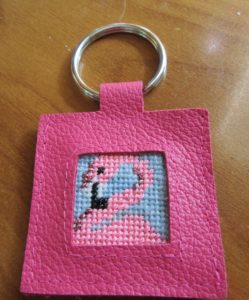
This keychain is hands-down one of the best needlepoint projects I’ve done in a long time. Using any of Point2Pointe’s 1 inch squares (and there are dozens from which to choose), you can stitch and finish the project in a day. You could also easily use their cross stitch designs or any other 1″ square design.
Let’s talk about the needlepoint first. Thoughtfully these come on 4″ squares of canvas, so they can be mounted on stretcher bars for easier stitching. That’s great because it makes them so easy to stitch.
Because the canvas is attached with double-sided tape, be sure to use full coverage stitches. If you don’t dust gets on the tape and destroys the bond. I stitched my flamingo in Tent using metallics for the bird and Lorikeet for the background.
The Keychain
The chain is just under 2″ square with the ring held in place by a leather tab. It’s made of soft pebble-textured leather. There is no stiffening inside the piece so even when finished the keychain remains soft and flexible, unlike many other self-finishing keychains.
I liked several aspects of this. The pebbled leather makes a lovely an practical choice because it wears well and won’t show scratches as smooth leather does. I also liked the softness of the leather, this made it incredibly easy to finish, in fact it was one of the easiest self-finishing items I have ever used.
Once assembled the keychain looks very professional. In fact it looks so good I’m sure the person who will get it will think it was bought not made until my daughter tells her differently.
This ease and the small size of the needlepoint make it a perfect starter project. I can also see many stitchers making multiple ones as gifts; that’s certainly my plan.
Finishing the Keychain
Because the margins on the chain are generous I trimmed my needlepoint 2 threads beyond the stitching. I like that this makes it easier to tuck under and stays more secure.
Expose the tape by removing the paper cover. The tape does not fill the entire opening, but it does extend beyond the edges; that is important for the next step.
Center your needlepoint over the opening. Do not press down!
Starting along one side, open the keychain and tuck the needlepoint in. This will be slightly harder at the corners. Because the leather is so thin, light, and flexible, this is easy to do.
Once the needlepoint is tucked in all around, press down firmly all around to secure the needlepoint and to seal the leather sides together.
I pressed before I tucked and had difficulty prying the sides apart.
The keychain and canvases are available in your local needlepoint shop.
I thought this was so much fun I want to make more! The only problem is no one I give needlepoint to needs keychains. I’d love idea for using them. Please add them in the comments.
Please note: This product was sent to me free of charge for purposes of review.
About Janet M Perry
Janet Perry is the Internet's leading authority on needlepoint. She designs, teaches and writes, getting raves from her fans for her innovative techniques, extensive knowledge and generous teaching style. A leading writer of stitch guides, she blogs here and lives on an island in the northeast corner of the SF Bay with her family

Wouldn’t it be lovely to use to give your trusted neighbor a spare house key?