Updated March 18, 2022.
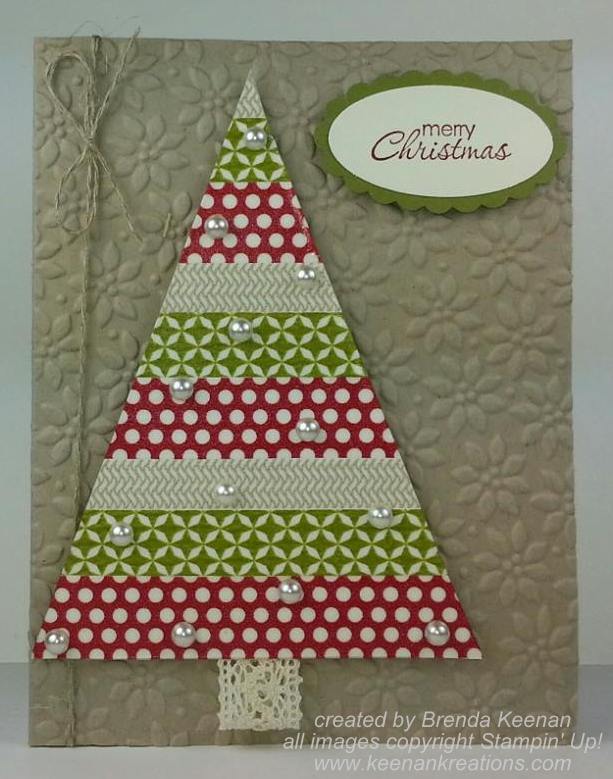
You have your stripey tree completed but it looks a little lost on all that canvas. Here’s where your creativity comes in — you can add elements to your design to make it great!
Trunk
Adding a trunk and packages to your tree is a great way to decorate this design.
Because of the width of the tree, the trunk needs to be 1-1.5 inches wide. Using a stitch with a vertical direction will emphasize the tree’s height. A great choice for this is Wide Lnenfold, below. This stitch isn’t too wide that it can’t be adjusted to your tastes.

The finished height of your trunk can be up to 24 threads high. If you are putting presents under the tree, it will need to be higher.
Presents
Here’s where you can go crazy with stitches and threads. My approach is the same as I take to wrapping real presents — anything goes! I’ll gather all kinds of threads using my scrap bag and then mix and match.
If you want your packages to be more coordinated pick out a ‘paper” color and a “ribbon” color and get all your threads out in those colors.
Mix them randomly.
Each package should use one paper color and one ribbon color. Packages are easiest if they are square. Any stitch that is square or rectangular can be used for your packages. For square stitches, you can divide them into four. Make two in each color of thread or explode the stitch by separating quadrants by two threads. Stitch a Diagonal Gobelin ribbon in the open threads.
A horizontal or vertical ribbon can separate two rectangular stitches to make a package.
Finally, a square layered stitch (like the Triple Rice in the border section below) can be done in different threads to make another package.
When you are stitching packages, make some decisions before you start to stitch. Do you want your packages to be all the same size? Do you want them to be spaced evenly? Do you want the same number of packages on each side of the trunk? By deciding these things you’ll know where to place your stitches for best effect.
More Trees
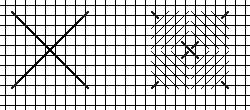
Your tree will look less lonely if you put it in a grove of trees. To do this draw additional trees using the same slope (2:1, or down 2 and over 1). The top point of the tree should be lower and over 2-3 inches from the first tree.
This will make the trees look further away and also have them partially obscured by the main tree.
If you make trees on either side, they should be different heights. If you put more than one tree on a side, they should be very different in height.
Draw in the sides of the tree using a ruler to connect your dots.
These trees will still be striped. You can make your stripes the same width, or slightly narrower (8 threads wide). It’s easiest to use the same stitches but in a different order, but you can also add new stitches.
You can reuse your threads, but more variety is also fun. If you are using more greens for these trees, make them darker, bluer, and more muted to make them look more distant.
If you are planning a border, stitch that first, so that the new trees don’t interfere.
Borders
The border for such a bold design, if you want one, should be equally bold. The best way to do this is to use a large stitch as the border. Triple Rice, below, is a great choice. It’s a very large Rice Stitch crossed by partial Scotch stitches.
I love this stitch made in contrasting textures or colors because the large cross shows at the center and in the corners. Thick about making it in metallic and a matte thread similar to, but not exactly like, one of the accents in your piece.
We often avoid borders because it’s hard to make them fit, but here we have some vertical wiggle room. Begin by finding the center hole at the bottom of the tree. Count down the distance you want at the bottom and count over three threads — this is one upper corner of Triple Rice. Make your Cross Stitch bases for this stitch to one side of the tree. Stop when you are happy with the clearance between these stitches and the tree.
Now make one Cross directly above your ending Cross to start up the sides. Stop and check. Do you still like the clearance? If so, then continue to make Crosses up the side. If not. take out this Cross, make another Cross along the bottom and repeat this process.
Stitch your vertical line of Crosses until it clears the top of the tree. Repeat the checking process.
Once this is done you have the counts for the border.
Go back to the bottom and stitch the crosses on the open side. The initial Cross Stitch should be in the center. Stitch up the side, there should be the same number of crosses on both vertical sides.
Finally, complete the Crosses by making the row across the top.
With this done, make the partial Scotch Stitches to finish the border.
Background
The background for this piece should be an open stitch. Which of the two you use depends on whether the tree is indoors or outdoors).
For indoors, make vertical rows of Diagonal Gobelin over 5 threads, below, 8 threads apart, centering it at the top of the tree.

If your tree is outside, you have more freedom. I like Double Straight Crosses, below, stitched in a white metallic scattered all over the background. They look like giant snowflakes.

Because the background is open, you will want to have colored paper or fabric behind this piece when you finish it. Metallic gold or silver is best for this.
My apologies that I have only the picture of the inspiration piece, my camerawas on the fritz.

About Janet M Perry
Janet Perry is the Internet's leading authority on needlepoint. She designs, teaches and writes, getting raves from her fans for her innovative techniques, extensive knowledge and generous teaching style. A leading writer of stitch guides, she blogs here and lives on an island in the northeast corner of the SF Bay with her family
I have been unable to locate the #8 stripe, was it accidentally missed out, or a numbering error?
I probably missed it. I’ll post it on Tuesday, March 22.
Keep stitching,
Janet