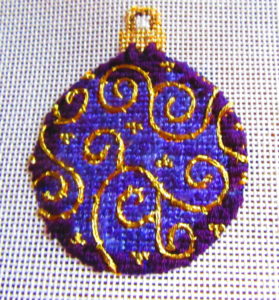
In my initial review of DMC’ Diamante I discovered in my test that this thread was a bit too stiff for Tent Stitch. I thought it might work well for couching. This charming Burnett & Bradley ornament shows that it does. I used both sizes of Diamante to couch the swirls. Diamante Grande wasb the couched thread. Diamante was the couching thread.
Why Couch?
Couching is a great technique that we should use more in needlepoint. Consider using couching when:
- your thread is too thick or uneven to go through the canvas
- the area is highly curved
- you thread is too fragile to go through the canvas repeatedly
- smooth, unbroken lines are needed
- your thread is too stiff to be used effectively for stitches
- the look of thread on top of stitching is wanted
In this project several of these factors applied. I had very curved areas. I wanted to showcase these by having smooth lines. The thread I was using was too stiff for regular stitches. Couching allowed me to use this thread and to highlight the swirls and make them look as if they were glitter swirls painted on the ornament.
Plan your Couching
To couch you need two threads and, often, two needles. Your thicker or more fragile thread is your couched thread. The thinner thread is the couching thread. The color of the couching thread should match as closely as possible the couched thread. Doing this allows the couching stitches to disappear. Because they disappear in this case, you do not have to couch at regular intervals.
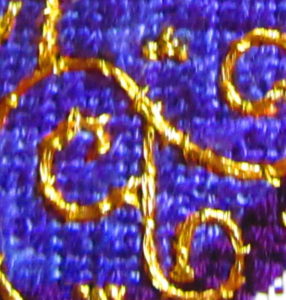
Before you begin to couch, study your canvas and make a map for couching. You can see why this is important in this ornament. Some swirls come out of other swirls the way branches come off the trunk of a tree. In order for this to look natural, the “branch” needs to be covered by the “trunk.” You can see several instance of this in the picture below.

When this occurs you must stitch the branch before the trunk. Study your canvas to see where these situations occur and plan to stitch these areas first.
Couching with Two Needles
To couch bring your couched thread to the front of the canvas. If you are using a needle, bring it out of the canvas at the end where you will stop couching. If the area is very curved, like these swirls, let your needle hang loosely on the front of the canvas. If it is not really curvy, bring your needle to the back of the canvas at the far end of the line to be couched.
Begin to couch at the end where the needle came out of the canvas. Doing this allows you to guide the thread and use the slack to keep the couched thread on the correct line.
The couching thread should go over the couched thread and, if possible, back into the same home.
Once the line is couched, bring both needles to the back of the canvas and secure them.
Couching with One Needle
If the thread is too bulky or uneven to go through the canvas, you’ll be using only one needle, for the couching thread. Lay the couched thread on top of the canvas with the free end at one end of the line. Begin to couch at the free end. Make your
to keep the couched thread on the correct line.
The couching thread should go over the couched thread and, if possible, back into the same home.
Once the line is couched, bring the needle to the back of the canvas and secure them. Cut the end of the thread just beyond the last couching stitch.
Watch for an upcoming post (I’m starting the project today) with more couching tips and how-tos.
About Janet M Perry
Janet Perry is the Internet's leading authority on needlepoint. She designs, teaches and writes, getting raves from her fans for her innovative techniques, extensive knowledge and generous teaching style. A leading writer of stitch guides, she blogs here and lives on an island in the northeast corner of the SF Bay with her family

Leave a Reply